Dreamy Room Level 189 Walkthrough & Guide
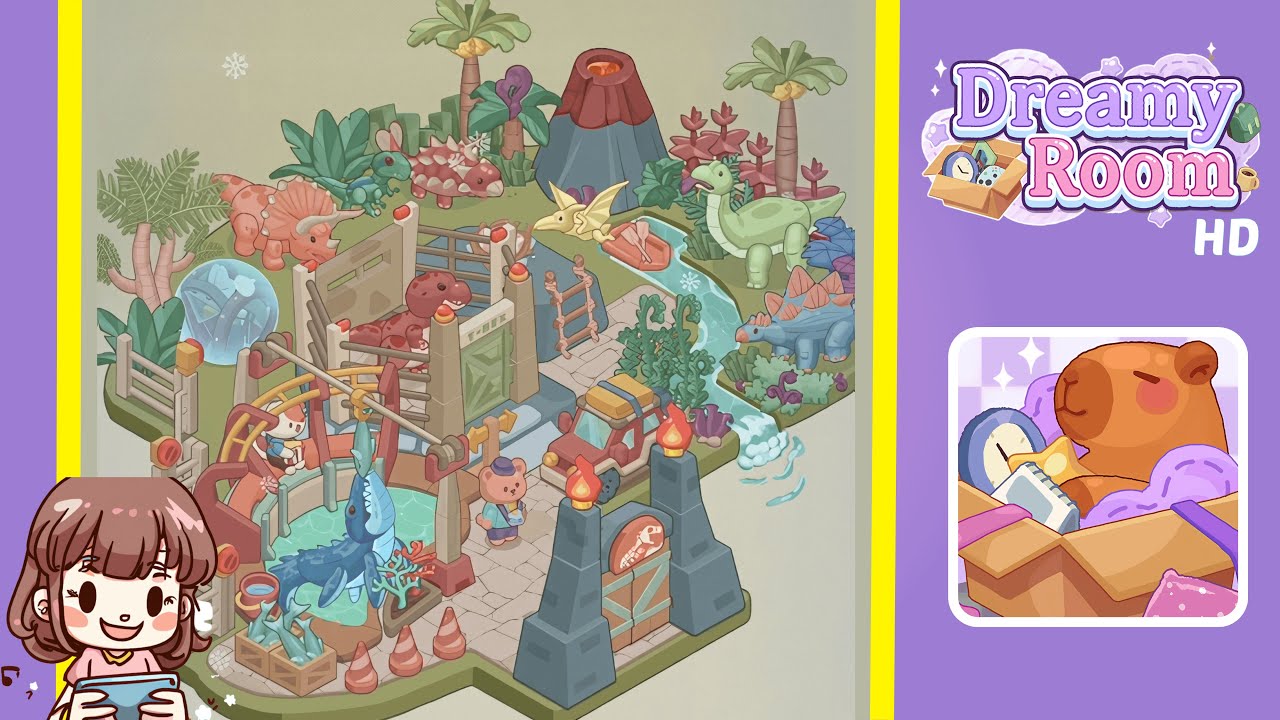
Welcome to the comprehensive walkthrough for Dreamy Room Level 189, where your goal is to transform an empty isometric plot into the lush, dinosaur-themed paradise shown in the completed image. In Dreamy Room Level 189, every placement counts: the game’s main challenge lies in determining the correct position for each object. Follow these steps carefully to recreate the final scene with perfect accuracy.
Step-by-Step Guide
- Place the stone pathway in the foreground. Begin by selecting the beige stone pathway tile set from your object menu. Align the pathway so that its lower edge matches the front lip of the platform, extending from the bottom center of the room to about one-third up the vertical axis. Precision is key to ensure correct base level for subsequent objects. Confirm the pale stones form a continuous surface covering the room's bottom area. Recheck the position to avoid misalignment.
- Carve out the water channel on the right. Using the water channel pieces, position the rectangular pool at the far right, aligning it with the platform edge at the stone path's top level. Attach the “S”-shaped channel so it exits with a small cascading waterfall. The channel must overlap the grass border edge by two pixels to achieve the water flow effect. Ensure the ripple texture faces the correct direction, testing placement by rotating through orientations.
- Add the entrance gate on the lower right. Select the dark stone entrance gate, comprising two pillars with torches and a wooden double door. Position it at the lower right corner, doors slightly above the grass border. Ensure the torches face inward and the dinosaur skull emblem is centered on the door. Verify the alignment of traffic cones in front for symmetry.
- Install the rotating shark display on the left. Locate the shark carousel mechanism and place it on the lower left side of the stone pathway, overlapping the grass border by one tile. Position the blue shark at the center, facing east, and ensure the animation avoids clipping. Position the wooden crate of fish and red bucket near the pool, slightly overlapping the pathway. Ensure the gears face outward and the NPC rabbit sits on the bench behind the display.
- Construct the dinosaur pen in the center. Use modular fence pieces and gate to build a rectangular enclosure above the path midpoint. Attach the “T-Rex” sign panel to the front fence, placing a red Tyrannosaurus, pink Ankylosaurus, and green baby dinosaur inside. Ensure the fence posts connect seamlessly, adjusting for no visible seams and no clipping with the ladder tile.
- Arrange the flora and volcano in the back. Choose tropical palm trees, ferns, and alien-style plants, placing two palm trees symmetrically on the back edge. Position the volcanic rock between them, surround it with bushes, and position a blue stegosaurus behind the right palm. Ensure layer depth by overlapping plants slightly over the grass border and adjust palm frond rotation for unique silhouettes.
- Position the red truck and teddy NPC. Select the red utility truck, placing it on the stone path to the fence's right entrance, headlights facing the player. Place the bear NPC in front, facing west, aligning its gaze with the T-Rex fence sign, ensuring no overlap with traffic cones or the fish crate, and confirming truck tire position with no grass contact.
- Finish with small decorations and final checks. Add detailed ornamentation, including a wooden rowboat in the north water section, oars inside. Place fish crates by the shark display and fence ladder, scatter four traffic cones (two at the gate, two bottom left). Rotate and adjust props for exact match. Walk through all camera angles to ensure no clipping, ensuring all elements are positioned correctly.
Notes & Precautions
- Alignment Is Key: Even a one-pixel misalignment can cause objects to clip or float. Use grid snapping and rotation tool's preview before placement.
- Layer Order Matters: Set larger back-row objects before front-row ones to ensure correct layering.
- Interaction Blocks: Ensure clear space around interactive elements to maintain functionality.
- Save Frequently: Use manual save slots before major changes to avoid loss, as there is no auto-save during decoration.
Tips & Tricks
- Use the Flip Tool: Master flipping pathway and fence segments to match curves without multiple rotations.
- Temporary Hide Mode: Temporarily hide large plants for precise small prop placement, then check overlaps by unhiding.
- Reference Image Overlay: Use a level screenshot overlay for perfect decoration alignment.
- Batch Selection: Speed up placement by moving grouped traffic cones or crates to ensure uniform spacing.