Dreamy Room Level 204 Walkthrough & Guide
Welcome to the Dreamy Room Level 204 walkthrough. This guide will lead you through the necessary steps to design the perfect kitchen ambiance in this enchanting game level. Ensure each piece is placed accurately to capture the essence of the level.
Step-by-Step Guide
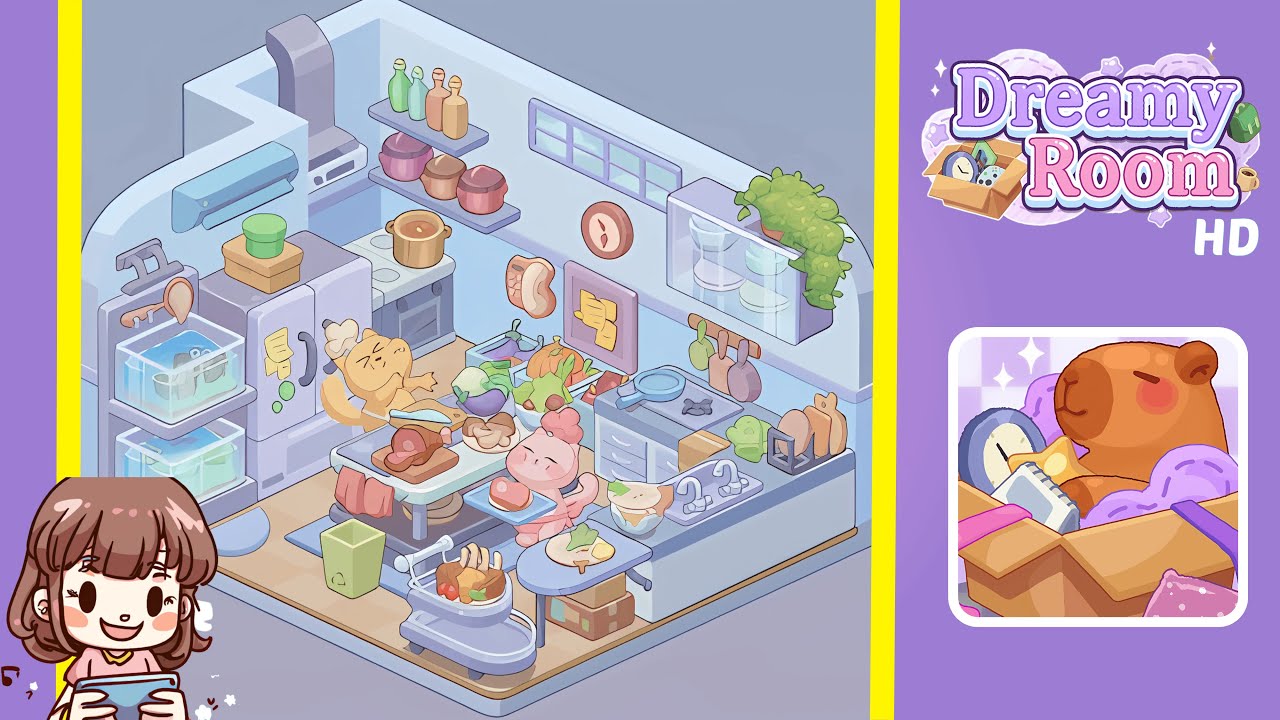
- Place the refrigerator and aquarium module in the left corner. Locate the refrigerator in the object selection panel and drag it to the far-left corner, aligning it with the soft blue and pale white walls. Next, place the aquarium module, split into two compartments, under the refrigerator's bottom edge, ensuring the tanks are level with centered fish.
- Install the stove, oven, and range hood on the back wall. Secure the gray stove and oven unit two grid squares from the left corner against the back wall. Attach the silver range hood above the stove, ensuring it is centered and aligned properly.
- Attach the air conditioner and floating shelves on the left back wall. Position the mint green air conditioning unit above head height and align it with the refrigerator's height. Mount two floating shelves to the right of the range hood, making sure they are level.
- Place the window, clock, message board, hooks, and plant cabinet on the right back wall. Position the rectangular window mesh toward the upper middle section, then hang the clock and sticky-note message board with precise spacing. Finally, install the plant cabinet with a potted plant on the far right.
- Install the double sink unit and countertop segments under the window. Position the double sink directly beneath the window, aligning the left basin edge with the third floor tile. Place two countertop segments on either side, ensuring no gaps.
- Add the central table, chopping block, vegetables, and cookware. Place the sturdy metal table at the center of the room. Position the wooden chopping block slightly off-center, add mushrooms and a raw steak, and put a cooking pot filled with soup onto the stove.
- Position the rolling cart, waste bin, and produce bins. Place the rolling cart to the lower left of the central table, position the green recycling waste bin adjacent to the table’s left leg, and the vegetable storage bins between the stove and central table.
- Place the chef cat, server cat, and final decorative accents. Position the yellow chef cat beside the chopping table and the pink server cat in the front right corner of the central table. Finish with small accents like hanging bread cutting boards and fridge magnets.
Notes & Precautions
- Always verify each placement grid position before finalizing to prevent penalties.
- Remember that the undo function is limited, so ensure correct orientation for each item.
- Avoid placing objects too close together to maintain the scene's harmony.
- Use the snap-to-grid guides wisely as they are critical to achieving accurate placements.
- Objects cannot be rotated beyond preset angles, so plan your layout around this limitation.
Tips & Tricks
- Memorize object coordinates for quicker placements.
- Utilize auto-align shortcuts by double-clicking to snap items to guide lines.
- Place major furniture first, then fill in decorative pieces to maintain focus.
- Save frequently as the game does not auto-save during edits.
- Use simulation mode to confirm character pathing and avoid collisions.
- Color-code groups of related items for faster recognition—consider green for produce.
- Keep reference screenshots to ensure exact item placements and avoid second-guessing.