Dreamy Room Level 221 Walkthrough & Guide
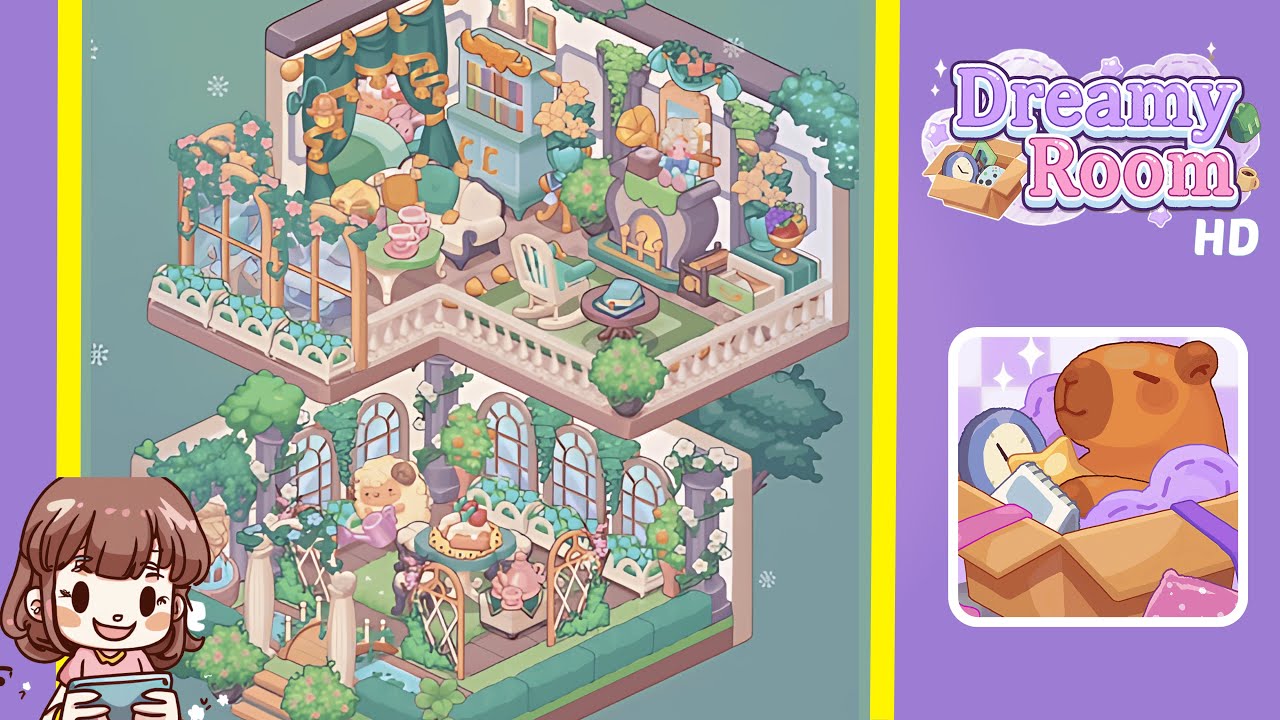
This comprehensive Dreamy Room Level 221 walkthrough will guide you step by step through transforming the empty isometric space into the charming, fully decorated two–story scene you see in the completed image. By following this guide, you’ll master the art of precise object placement and enjoy the relaxing chaos of bringing every treasured keepsake to life.
Step-by-Step Guide
- Place the arched windows and planters on the upper balcony. Add three large arched window frames along the upper balcony front, attach the white planter boxes beneath each window, and fill them with clusters of blue hydrangeas.
- Place the vine-draped trellis panels on the upper balcony. Add vertical trellis sections on either side of the arched windows, wrap with vines, and ensure alignment for later decorations.
- Place the canopy bed and seating on the upper floor. Set the round canopy bed against the back left wall, position the loveseat next to the bed, and place the rocking chair slightly angled toward the fireplace.
- Place the coffee table, tea set, and pillows. Position the green-topped coffee table between the loveseat and rocking chair, add the pink tea set, then arrange floor cushions and throw pillows for charm.
- Place the bookshelf cabinet and wall art. Position the teal bookshelf cabinet on the right back wall, hang botanical prints above it, and adorn with decorative molding for a complete vignette.
- Place the fireplace, griddle, and plush toy. Align the purple fireplace with the lower right wall, add the gramophone and vinyl record box above it, and place a plush sheep toy and golden vase to finish the hearth scene.
- Place the garden arch, fountain, and hedges on the lower level. Create a garden courtyard with a trellis archway, centered fountain, and hedge sections that border the space.
- Place the sheep, cake table, tea trolley, and final foliage. Add a watering sheep figurine, a cake table with strawberry shortcake, a pink tea trolley, and sprinkle vines and snowflake effects to complete the scene.
Notes & Precautions
- Object Overlap: Always check for clipping after placement, especially with transparent vines and glass planters, to avoid visual glitches.
- Rotation Alignment: Rotate items in 45° increments to align with the isometric perspective.
- Inventory Order: Consider placing large furniture first to prevent blocking smaller décor placement slots.
- Performance Tip: Disable animations in settings if experiencing lag on lower-end devices.
- Undo Function: Use the undo button if a piece snaps incorrectly to maintain precise coordinates.
Tips & Tricks
- Batch Placement: Select similar objects in succession for faster decoration and uniform spacing.
- Use Zoom & Pan: Zoom in on the grid for pixel-perfect alignment and pan to prevent misplacement.
- Corner Anchoring: Start by anchoring objects in corners to provide layout reference points.
- Save Presets: Save layout presets, if available, for quick application on similar levels.
- Color Harmony: Maintain pastel and muted tones to align with the Dreamy Room aesthetic.