Dreamy Room Level 237 Walkthrough & Guide
Welcome to Dreamy Room Level 237. This guide will help you place items precisely to build the perfect watermill retreat on the floating island.
Step-by-Step Guide
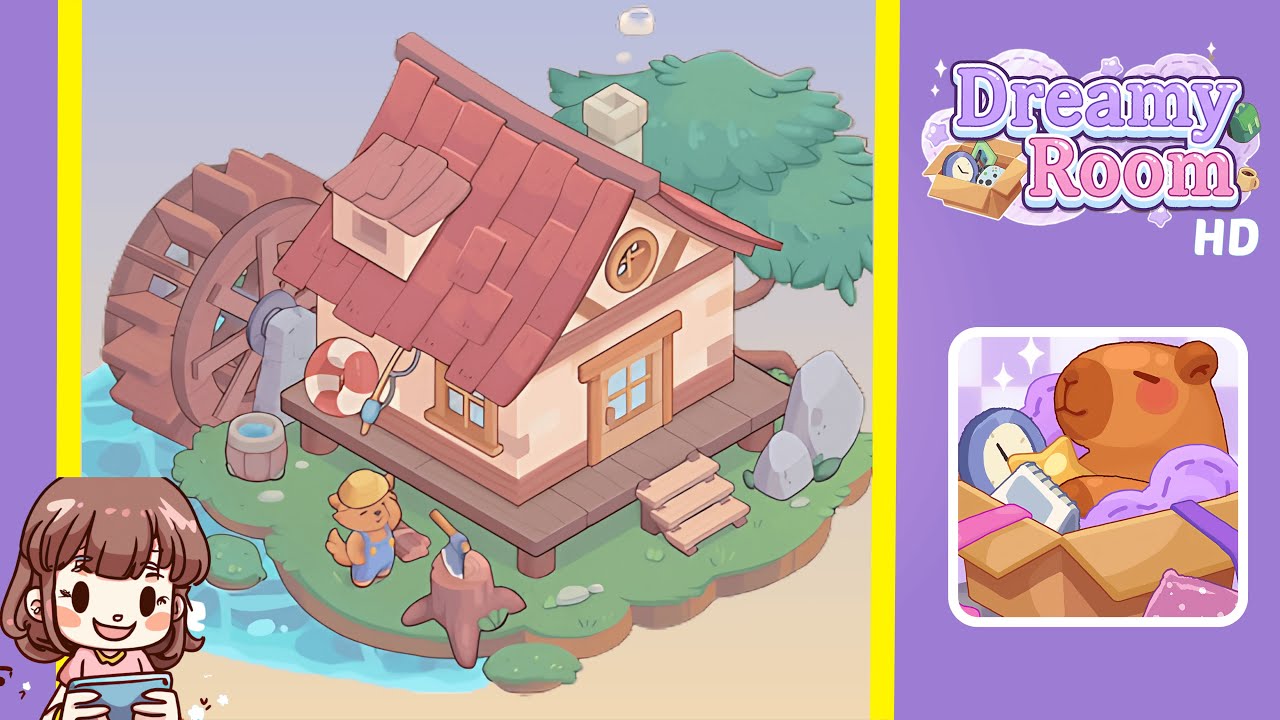
- Place the watermill cottage base in the center of the platform. Align the cream-colored, timber-framed structure precisely to ensure room for all decorations. Use alignment guides to snap the cottage to the grid, ensuring its bottom edge is flush with the front plank edge, and confirm equal space on both sides.
- Attach the red-tile roof atop the cottage. Drag the curved red-tile roof piece over the cottage walls until it snaps, ensuring the dormer window faces forward to unlock the chimney slot. Make sure the roof aligns with the cottage’s central axis.
- Insert the chimney and round accent window on the right. Place the chimney in the slot at the back-left of the roof, and slide the circular window into the cutout on the right wall. Align the window so the crossbars form an “X.”
- Place the front door and square grid window on the façade. Insert the rectangular wooden door into the center of the front wall, ensuring no gaps. Align the square grid window with the grooves to the left of the door and listen for the click to verify correct placement.
- Secure the water wheel assembly on the left side. Position the axle so it slots into the wall bracket above the decking. Rotate the wheel slightly to lock the paddles in place, ensuring it sits flush against the cottage.
- Position the fishing accessories by the water wheel. Place the wooden barrel next to the wheel’s base. Hang the lifebuoy on the railing post and lean the fishing rod against the railing over the water. Place the trough beneath the rod, ensuring a ripple animation appears.
- Arrange the steps, decorative rocks, and tree. Place the wooden staircase at the front-right edge, and position rocks to frame the door. Position the tree behind the cottage without clipping through the roof.
- Add the chopping stump, axe, and bear figure. Place the stump on the front-left grassy ledge, embed the axe into its center, and position the bear figure with its gaze directed toward the axe. A warm glow will confirm completion.
Notes & Precautions
- Alignment Precision: Even a one-pixel misalignment can prevent items from locking in. Look for green highlight zones before releasing an object.
- Object Order: Follow the sequence above. Placing smaller décor before larger structures can cause snapping failures.
- No Undo Button: Rotating and repositioning is limited. Misplacing a key piece may require a restart.
- Canvas Limits: Avoid dragging objects outside the grassy platform boundary, as items will reset.
- Visual Cues: Pay attention to soft clicks and animations indicating correct placement; absence means retry.
Tips & Tricks
- Grid Snapping Hack: Turn on the snap-to-grid guide in settings for foolproof alignment of items like the red roof and square window.
- Zoom and Pan: Use pinch-to-zoom and pan to ensure all guides are visible, particularly for the barrel and fishing rod.
- Use Shadows: Using shadows gives real-time feedback on height alignment to match the deck's pattern.
- Save Checkpoints: Complete each major placement (house, roof, wheel) and quit to menu to create a quick checkpoint.