Dreamy Room Level 336 Walkthrough
Explore the delightful Dreamy Room Level 336, a multi-tiered tree home adorned with charming details. To create a cozy and inviting environment, follow the step-by-step guide below, ensuring each item is carefully placed to preserve the level's intricate design.
Step-by-Step Guide
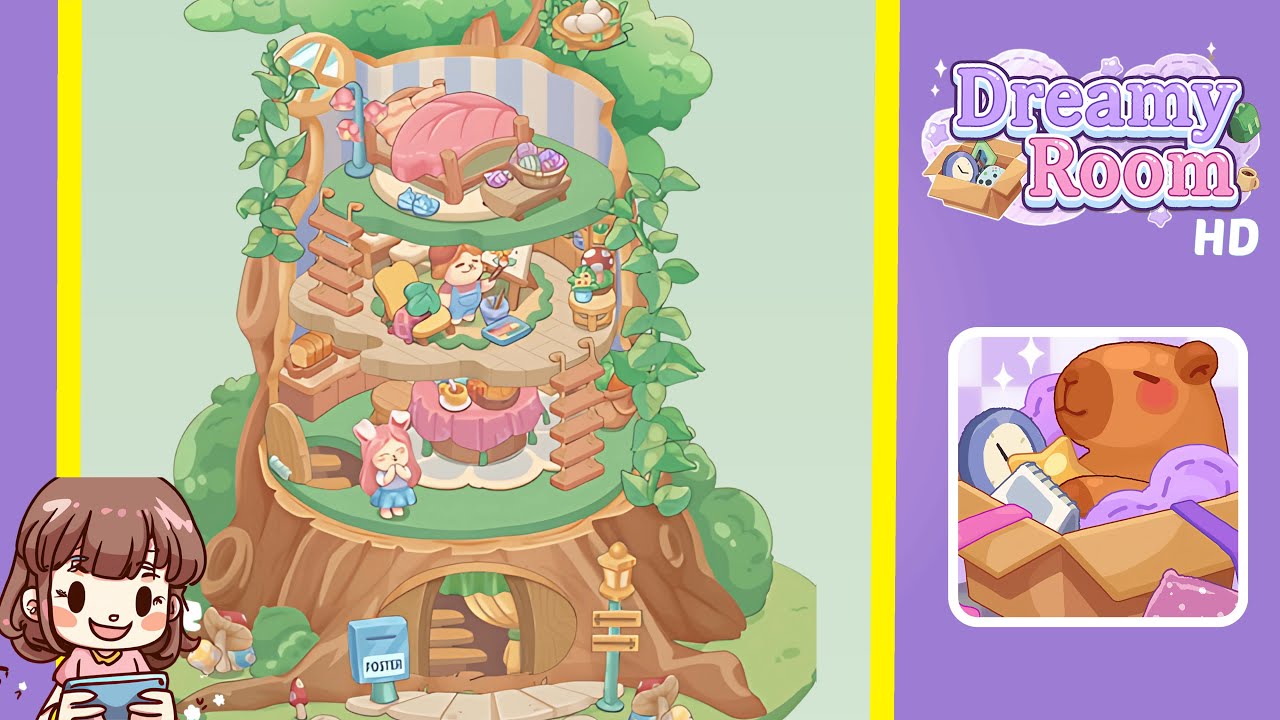
- Place the pink bed on the top circular platform. Position it at the center of the green platform with room in front for a small bench and a basket of yarn. Add the floral floor lamp to the left-back of the bed, the yarn basket on the right side, and tiny blue slippers near the footboard. Place the green rug under the bed for an integrated appearance.
- Place the artist easel and the bear painter on the middle floor. Position the wooden easel slightly off-center and put the bear painter behind it. Add a paint palette and brush set on the floor. Place the yellow lounge chair to the left, small side table with a plant pot and paintbox to the right, and a wooden shelf with food items at the left-rear. Attach wooden rope ladders to the edges for vertical navigation.
- Place the round pink-clothed table on the lower middle floor. Center it over the carved opening and arrange a teapot, cups, and cake on it. Position the pink-haired girl character slightly in front of the small hatch door, and place a wooden stool or trunk nearby. Add short ladders on either side to create vertical movement and adjust the table's skirt shadow.
- Place the entrance door, poster box, signpost, and ground props at the base. Insert the carved wooden doorway, blue poster mailbox, and signpost with lamppost strategically around the entrance. Arrange decorative elements like mushrooms, stones, and a tiny gift-wrapped bundle to create a balanced foreground.
- Place the vines, nest with eggs, canopy trees, and background stripes. Arrange leafy vines, the tree canopy, and a bird’s nest seamlessly to enhance the level's thematic charm. Use a subtle striped backdrop and scattered greenery to complete the scene's depth and continuity.
- Final polish: small props, layering, and interactive hotspots. Adjust prop placements and layering, ensuring ladders overlap correctly, and interactive elements align with the environment. Save and review the layout for consistent shadows and occlusion.
Notes & Precautions
- Work from top to bottom to prevent higher-tier objects from obscuring lower-tier interactables.
- Maintain correct layering rules for items like ladders, rugs, and props to ensure clickable hotspots align.
- Make slight pixel adjustments to resolve overlap issues unique to the level.
- Avoid overfilling platforms; leaving space enhances animatability.
- Use micro-adjustments for depth corrections if something appears off.
Tips & Tricks
- Save incremental versions during development to easily recover from layering issues.
- Use the bed and top rug as anchoring points for faster level alignment.
- Temporarily hide the background canopy when placing mid-floor props for better visibility.
- Apply symmetry in arranging entrance elements for balanced visuals.
- Differentiate props needing "on-top" versus "background" positions for efficiency.