Dreamy Room Level 346 Walkthrough & Guide
Welcome to the comprehensive walkthrough for Dreamy Room Level 346. Follow this guide to create the perfect setup without any clipping issues or misplaced elements.
Step-by-Step Guide
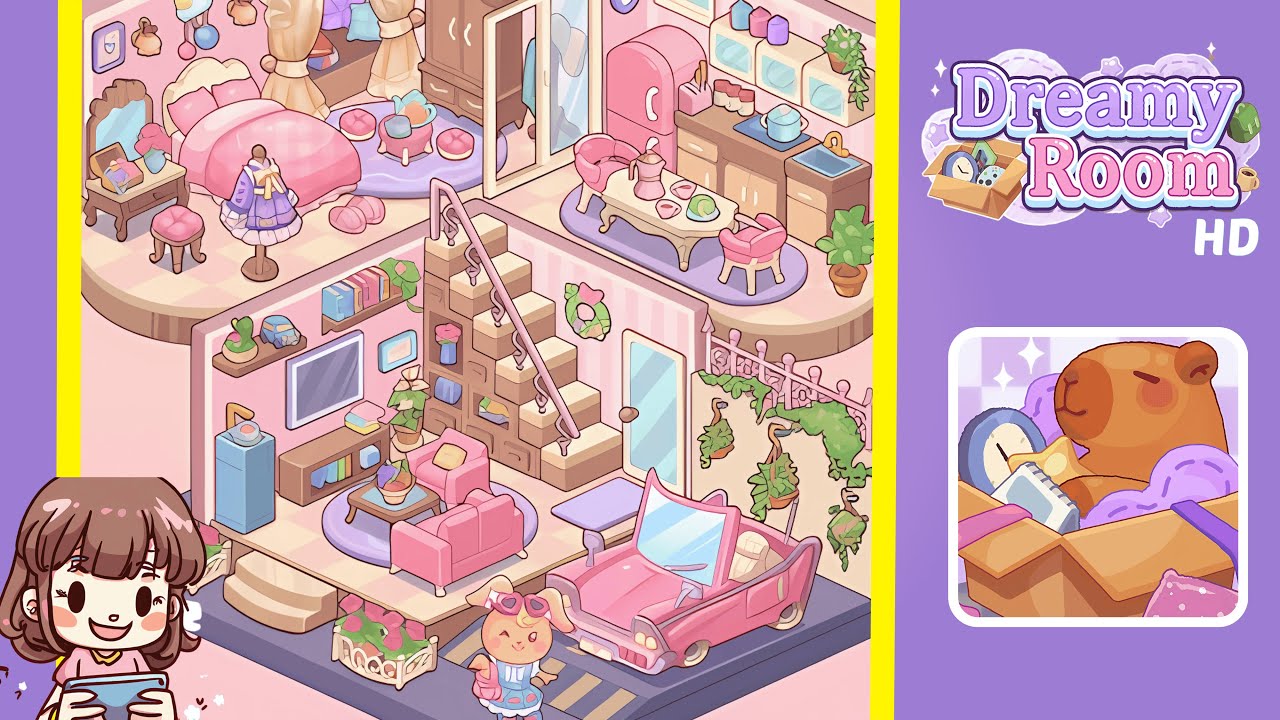
- Begin by anchoring the large base pieces, ensuring everything else aligns properly. Place the purple ground platform centered on the grid, then add the raised wooden step platform to align with the front-left edge. Position two white ornate rose planters on the entrance platform, one on each side of the steps, centered on the rounded cutouts. Next, add the short front steps aligning them with the planters. To the right, place the gray-blue parking pad with yellow stripes and the pink convertible ensuring its rear wheels sit on the stripe. Completing these elements first avoids future overlaps.
- Place the pink convertible with the driver’s side facing the room’s central lower-right corner, slightly open the hood toward the viewer. Position the small bunny character one grid square in front of the car, slightly left of center, facing the house. Add the low wrought-iron fence along the rightmost lower wall, aligning its posts with the purple base edge. Hang three triangular planters from three fence hooks evenly, ensuring no clipping with the car or steps.
- In the lower-left interior, place the raised living room platform so its front edge aligns with the main steps. Center the medium circular purple rug on the platform, then place the two-seater pink sofa against the left wall on the rug. Set the rectangular wooden coffee table centered in front of the sofa with a fruit bowl on it. Mount the flat TV screen above the low wooden TV cabinet, and add books and a toy car on nearby shelves. Add a tall blue water dispenser on the platform's leftmost edge, ensuring appropriate alignment.
- Create the staircase using a stack of decorative boxes as steps. Position the stack so the bottom-left corner is behind the sofa, with the incline leading to the second level. Arrange the boxes in a stepped pyramid, attaching a banister to the outer edge. Place a small wreath on the wall beside the stair midpoint and decorate the boxes with tiny potted flowers, a book, and a small door with a frosted glass panel to the right.
- Enhance the mid-level area with decor. Place a welcome mat centered in front of the frosted glass door without overlapping the stair base. Add a potted plant on the mid-level bookshelf ledge near the TV and hang a framed picture above. Position a petite side table with a floral arrangement beside the sofa and a square rug in front of the door. These elements add warmth and scale.
- In the upper-left bedroom, place the pastel checkered bed slightly left of center with its headboard against the wall. Center the pink quilt and pillows. Add a purple oval bedside rug to the right and an ornate wooden nightstand with a leaning mirror to the left. Place a round stool near the footboard and a dressing table against the left wall, all ensuring proper alignment.
- Install the window seat with beige curtains and pastel cushions centered below the window. Position the tall wardrobe flush to the corner, place the dress form with a purple gown near the bed, and set a low tea table with poufs and a tea set on a rug. Ensure wardrobe doors face the walkway.
- Set up the kitchenette in the upper-right corner. Fit the tall pink fridge against the back-right wall near the sliding doors. Install the counter unit with the sink and stove to the fridge's right. Mount wall cabinets populated with jars above and arrange a dining table with chairs on a rug in front. Make sure everything aligns correctly with the sliding doors.
- Install the sliding glass door between the bedroom and kitchenette, ensuring it aligns with the floor track. Hang a wall clock above the counter, a window above the kitchen for depth, and scatter small plants around. Decorate the outer wall with hanging plants and a fence trellis.
- Finish with final accessories and alignment checks. Add bookshelf items, decorate the living chair with a cushion, and place various knickknacks throughout. Ensure all elements are well-aligned and nothing is floating or clipping.
Notes & Precautions
- Focus on placement precision: start with large anchors, follow with mid-size, then small accessories.
- Avoid placing items off-anchor, which can cause floating visuals.
- Watch for collisions, especially with the sliding door and wardrobe or banister intersections.
- Save frequently to prevent losing progress from accidental moves.
Tips & Tricks
- Place the largest platform and perimeter items first, using highlight mode to see anchor points.
- Utilize snap-to-grid and fine-nudge shortcuts for precise adjustments.
- Duplicate symmetric items with the duplicate/mirror tool to maintain spacing.
- Keep a checklist of steps to ensure no detail is missed.