Dreamy Room Level 328 Walkthrough
Welcome to the Dreamy Room Level 328 walkthrough. This guide will take you through a precise layout in a cozy racer's workshop. Accuracy in placement is crucial to avoid cascading misalignments as you arrange the various objects in this intricate puzzle level.
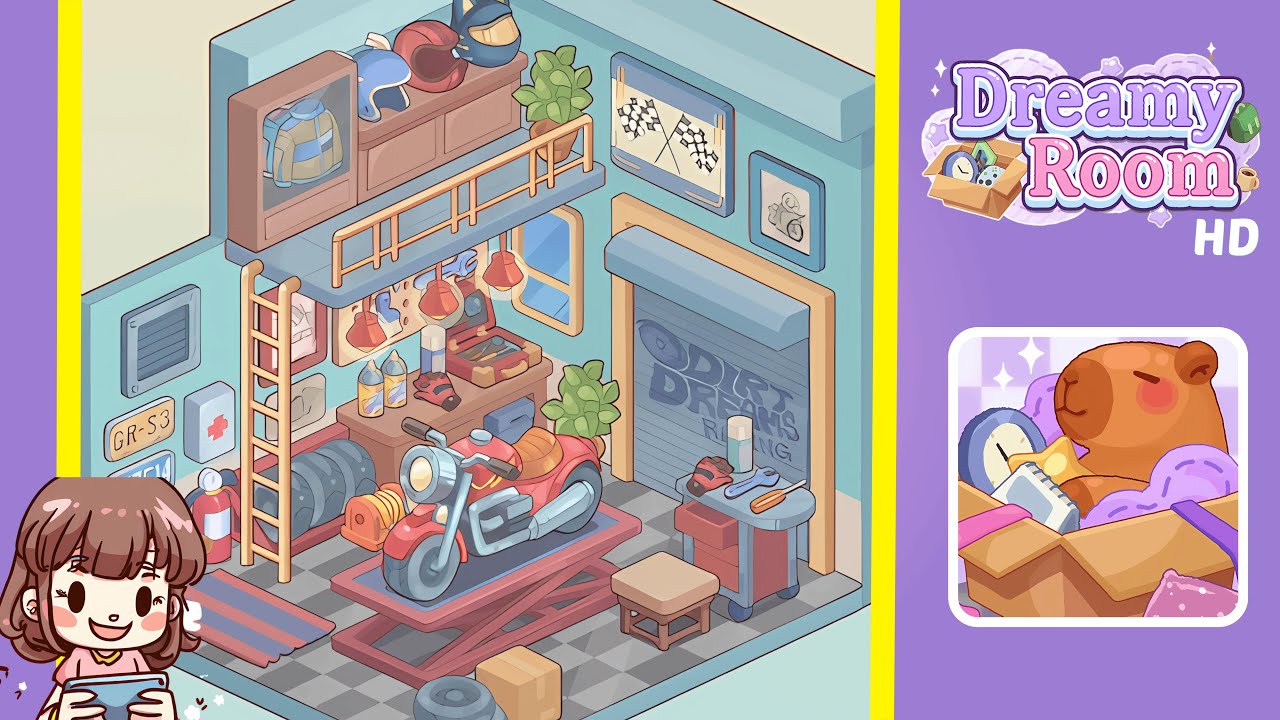
Step-by-Step Guide
- Place the roll-up garage door on the right wall. Start by anchoring the steel roll-up door marked "DIRT DREAMS RACING" centered on the taller right wall. Align it so the base sits a tile above the floor line.
- Place the two racing art frames above the door. Decorate the right wall with a large framed art piece of crossed checkered flags and a smaller frame depicting a green motorcycle, ensuring they do not overlap the door trim.
- Install the mezzanine storage cabinets along the top left. Position a row of wooden cabinets high on the left wall, including a glass-front cabinet displaying a padded riding jacket, then arrange three helmets on top.
- Add the catwalk, safety rail, and wooden ladder. Place a short blue platform with a safety rail under the cabinets, ensuring the ladder leans on the left interior wall with rungs clear of cabinet doors.
- Mount the left-wall fixtures: vent, plates, first-aid, extinguisher, and rug. Center the ventilation grille high on the wall, followed by vertical license plates, then place a first-aid box, fire extinguisher, and a striped floor mat at the bottom.
- Build the work zone: bench, pegboard, and pendant lights beneath the mezzanine. Position a workbench under the catwalk, hang a pegboard above it, and line up three red pendant lights, adding a window and arranging tools on the bench.
- Populate the tire storage and corner details. Behind the ladder, place a metal tire rack loaded with tires, an air tank at floor level, and a technical poster to the left of the pegboard.
- Center the scissor lift and park the motorcycle. Align the lift in the room’s center, placing the motorcycle on it oriented towards the left-front corner.
- Add greenery and window balance. Position a potted plant between the bench and garage door, ensuring symmetry with a second plant on the catwalk’s far end.
- Arrange the right-side tool cart and stool. Roll a red tool cart inside the door plane and position a stool next to it.
- Scatter the front-floor clutter: tires and box. Stack loose tires slightly left of center, placing a sealed cardboard box next to them.
- Final micro-checks: lights, shadows, and spacing. Ensure pendant lamps hang evenly, the first-aid box doesn’t interfere with the ladder, and all objects are properly aligned.
Notes & Precautions
- To avoid running out of vertical space on the left wall, place items in order: vent, license plates, and then first-aid box.
- Ensure the ladder does not obstruct the glass cabinet door.
- Keep a half-tile gap between the lift and tool cart for stool placement.
- Position the window to the right of the pegboard to prevent collision with a pendant light.
- Utilize floor-tile seams for alignment; they are crucial in this level.
Tips & Tricks
- Start with the tallest wall anchors like the door, cabinets, catwalk, and ladder first to avoid later adjustments.
- Use "triangles of interest" to speed up placement: ladder-vent-plates, lamps-window-plant, cart-stool-door.
- Group similar items together as the game appreciates thematic clustering.
- Check for overlaps if items seem off; ensure nothing blocks the catwalk rail or cabinet fronts.
- Save foreground clutter like tires and boxes for the end to fine-tune pathways.