Dreamy Room Level 347 Walkthrough
Welcome to the Dreamy Room Level 347 walkthrough. This guide will help you navigate through each step required to complete the level with precision. Ensure to follow every step closely to achieve the correct setup and decoration.
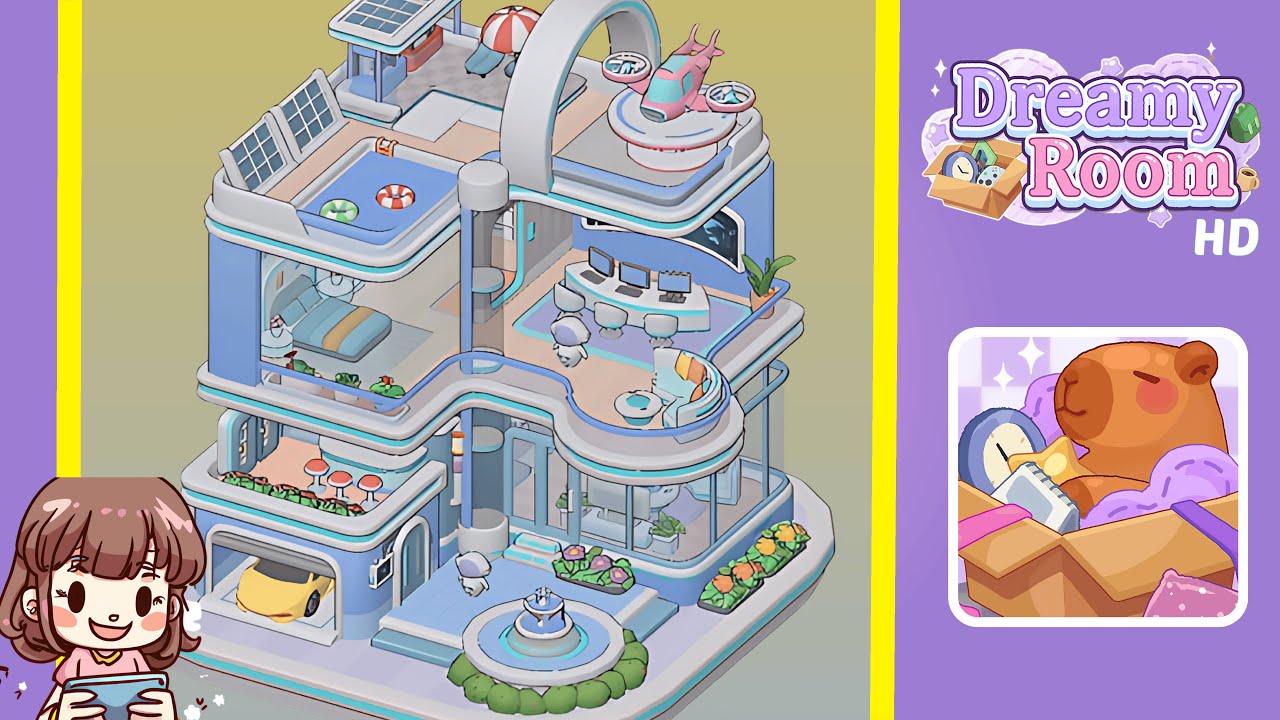
Step-by-Step Guide
- Place the circular fountain at the center of the platform. Ensure it is two tile-units from the front edge, enclosed by a continuous ring of hedges. Add short stone steps behind the fountain for symmetry. Verify that the pale lavender tile colors are visible.
- Set the garage and yellow car at the front-left platform corner. Make sure the garage door fits into the groove and the car fits entirely. Complete this with a wall-mounted screen and walkway tile, followed by three coral stools on a small balcony planter above the garage.
- Construct the sitting room on the right side. Position the glass walls, curved sofa, and other furniture ensuring adjacency and color matching, adding exterior flowering beds for completion.
- Install the cylindrical elevator centrally, aligning it with floor cutouts. Add stair tiles, decorative columns, and the landing platform to complete the vertical connection.
- Decorate the left second-floor bedroom and balcony. Place a pale blue bed and bedside accompaniments. On the balcony, insert filled planter boxes with plants and flowers.
- Position the office on the second-floor right. Place the desk with monitors, add stools and a plant. Finalize the area with a coffee table and lounger on the mini-balcony.
- On the rooftop, install a shallow pool and life rings. Behind the pool, position solar panels properly. Set a vending kiosk at the rear, ensuring all pieces are linked.
- On the right rooftop, install a curved white arch over a helipad platform and a pink helicopter. Add a pedestal and neon ring beneath for lighting, completing with surrounding railings.
Notes & Precautions
- Ensure pixel-perfect placement to avoid snapping issues.
- Verify completion of group sets, checking for all items.
- Use isometric camera views for different perspectives.
- Ensure color matching in neon trims and tiles.
- Regularly save progress after completing major sections.
Tips & Tricks
- Anchor main structures first before filling in other items.
- Utilize "ghost" previews for potential snap adjustments.
- Make micro-adjustments for blocked items.
- Combine color and style for decorative bonuses.
- Rotate to inspect placements visually.
- Stage objects thoughtfully to complement NPCs and lighting.