Dreamy Room Level 333 Walkthrough
Embark on the enchanting journey of Dreamy Room Level 333, where building a whimsical diorama of a gift-box stage is your goal. This guide details every essential step to align elements precisely, ensuring a delightful outcome.
Step-by-Step Guide
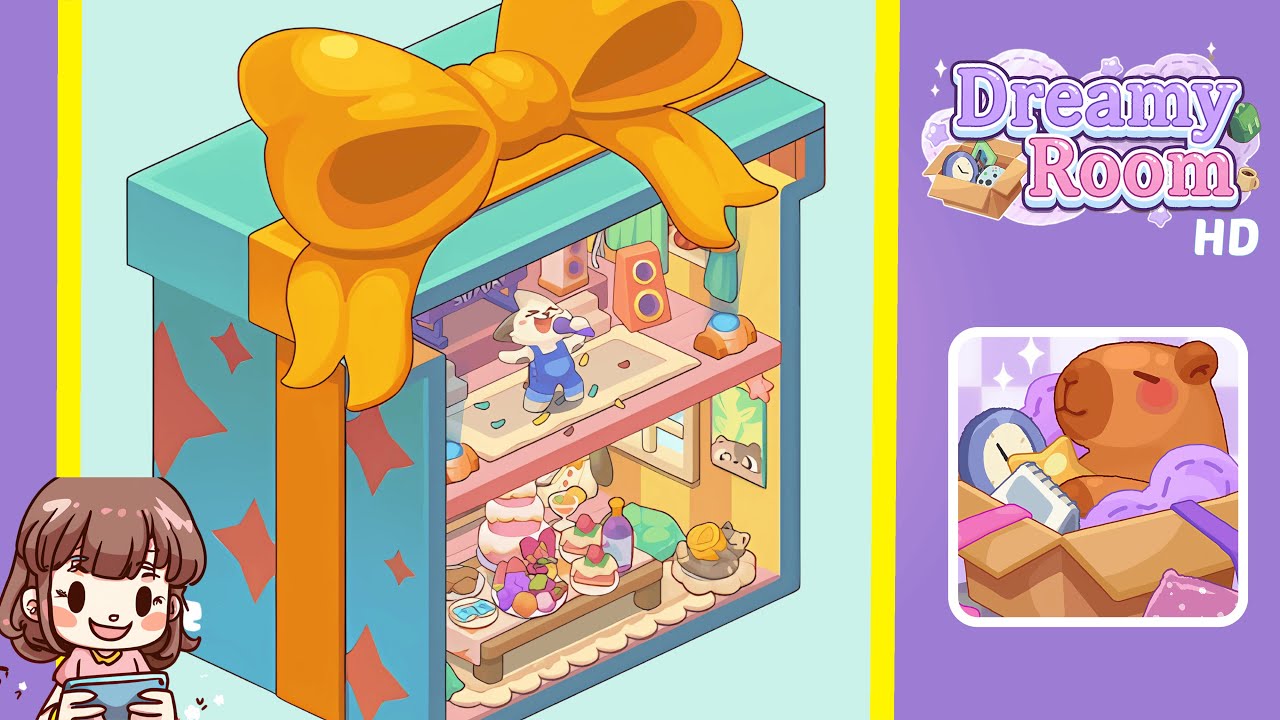
- Begin by placing the turquoise gift-box shell around the room frame. Ensure the teal lid and edging match the roof outline. Align the orange vertical ribbon with the front left edge and face the orange star decals towards the doorway. Seat the glossy yellow bow on the lid, with its center above the front opening and tails slightly drooping over the lip. Ensure precise alignment as Dreamy Room Level 333 is picky about millimeter perfection.
- Set the mezzanine floor and stage rug on the upper level. Position the pink upper platform flush with the back wall, leaving its front edge behind the box lip. Place the cream stage rug at the platform's center-front, ensuring it rests atop the floor. Sprinkle confetti pieces onto the rug area, anchoring them to the mat. This locks the foundation for the performance zone.
- Place the singer on stage and hang the banner on the back wall. Stand the white-and-gray cat performer, dressed in blue overalls, slightly left of center on the rug. The mic should be in the cat's right paw, mouth open towards the audience. Hang the purple performance banner on the upper back wall, ensuring its ends are even with the singer's shoulders.
- Organize the stage's right side by placing speakers, console, window, and curtains. Position the two tall orange speakers against the right wall, with the rear speaker near the corner. Park the small orange console block between the speakers and wall. Set the square window above the console, and drape the mint curtains so they slightly cover the inner box rim.
- Place the dining table and scalloped rug on the lower level. Center the cream scalloped rug on the lower floor, ensuring its edge mirrors the front opening. Place the sturdy wooden dining table on the rug, aligning its legs with the scallops.
- Arrange every dessert and drink on the table from left to right. Start with a tall pink roll cake on the left rear, followed by cookies in front. In the center-rear, place the grand white tiered cake with strawberries. Pile purple grapes and citrus in front-center on a fruit plate, followed by a small strawberry shortcake and finally, pastries and a purple bottle on the far right.
- Build the cozy lounge on the lower-right wall by first placing the framed plant artwork. Position the mint-green sofa at a shallow angle beneath it, with a dotted throw draping across the arm. Place a round pedestal table with a large yellow yarn ball and knitting needles in front, and a small gray cat curled on a cushion beside it.
- Fill the lower-left with background character and complete the box. Tuck the shy critter face under the mezzanine, ensuring only the head and ears appear from behind the table edge. Ensure the pink floorboards run front-to-back and that the vertical wall stripes alternate in warm yellows and oranges. Lastly, verify the exterior ribbon alignment and star decals are correct.
Notes & Precautions
- Depth order is crucial: rugs go before furniture, furniture before decor, and decor before confetti.
- Avoid placing objects too close to the front box lip to prevent bleed-through in the parallax.
- The upper-right cluster, including speakers and console is sensitive, so start with the window to align correctly.
- Keep banquet items separated to avoid overlapping shadows.
- Ensure the bow's tails drape over the lid's front seam to pass silhouette checks.
Tips & Tricks
- Group objects by floor and wall before decorating.
- Use the singer as a visual ruler for mezzanine alignment.
- Start placing food from the big cake outward to ensure proper snapping.
- If a snap won't register, try lifting the object and dropping it from a higher point for better alignment.
- Pan along the right wall to correctly position the framed plant.