Dreamy Room Level 175 Walkthrough & Guide
Welcome to the walkthrough for Dreamy Room Level 175. This guide will take you through each precise placement needed to transform the room into a serene undersea sanctuary.
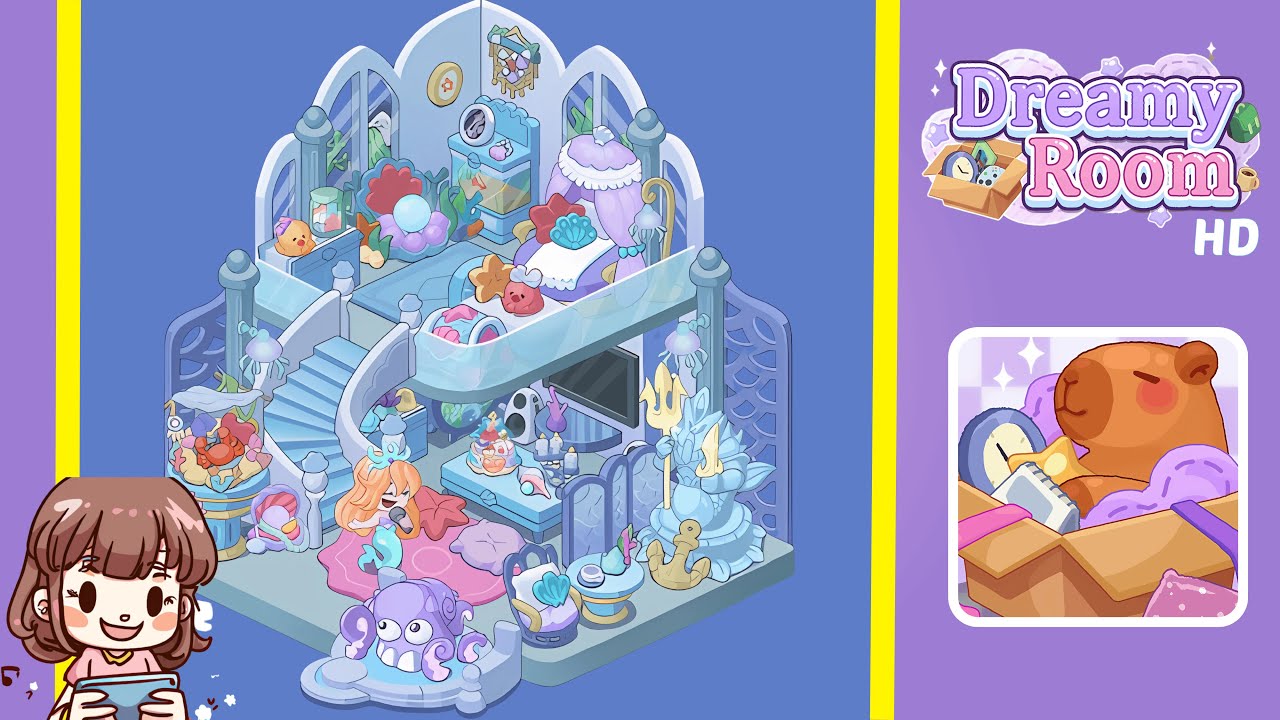
Step-by-Step Guide
- Place the three-panel arched window divider against the back wall. Start by snapping the left panel flush to the left side of the grid, align the center panel at the midpoint, then add the right panel. Ensure the panels align perfectly for the stage to be set.
- Position the seafoam-green raised platform in the center of the room. Align it both horizontally and vertically, with the front edge slightly forward and the back edge near the window divider. Ensure it is centered to avoid errors.
- Install the spiral staircase on the left side of the platform. Align the bottom step with the platform’s front-left corner and adjust it so it appears to rise naturally. Watch for the green checkmark for correct placement.
- Hang the jellyfish lamps and shell wreath on the walls. Attach the lamps to the front-left, front-right, and middle back posts, ensuring equal height. Center the shell wreath on the middle divider panel.
- Position the coral throne and seashell chaise lounge on the platform. Place the coral throne on the back-right and ensure it doesn’t overlap the divider. Position the chaise lounge on the front-right edge with its canopy facing inward.
- Add the under-stair aquarium, speaker, cake set, and candle tray. Place the aquarium under the staircase, the speaker beside it, the cake set on a small table, and the candle tray beside it. Avoid overlap for correct grid placement.
- Place the octopus fountain, shell table, and anchor statue at the front. Position the octopus fountain slightly left of center, arrange the shell chairs and table, then position the anchor statue to clear the edges without clipping.
- Add the character plushie, crab friend, seashell decor, and final accents. Place the mermaid plushie on the rug, the crab plush on a side table, the pearl-topped shell on the table near the anchor, and arrange coral plant clusters strategically.
Notes & Precautions
- Grid Alignment Sensitivity: Even a one-pixel misplacement can lead to rejection.
- Clipping Avoidance: Proper rotation prevents overlapping, especially with the staircase and seating.
- Layer Order Awareness: Follow the correct order of placement to comply with the enforced layer structure.
- Rotation Locking: Look for the rotation lock indicator to ensure accurate placement.
- Patience Required: Focus on precision rather than speed for successful placement.
Tips & Tricks
- Use the Zoom Tool: Crucial for micro-adjustments to avoid clipping.
- Ghost Preview Method: Visualize the object’s position before placement to avoid overlaps.
- Layer Lock Toggle: Lock lower layers to prevent accidental shifts.
- Save Custom Position Presets: Useful for replaying with precise coordinates.
- Start with Bulkiest Items: Auto-adjust the grid effectively by placing large items first.