Dreamy Room Level 298 Walkthrough
Welcome to the comprehensive guide for Dreamy Room Level 298. Follow this detailed walkthrough to recreate this charming two-level space accurately, featuring intricate decorations and thoughtful placements that define the unique charm of this level.
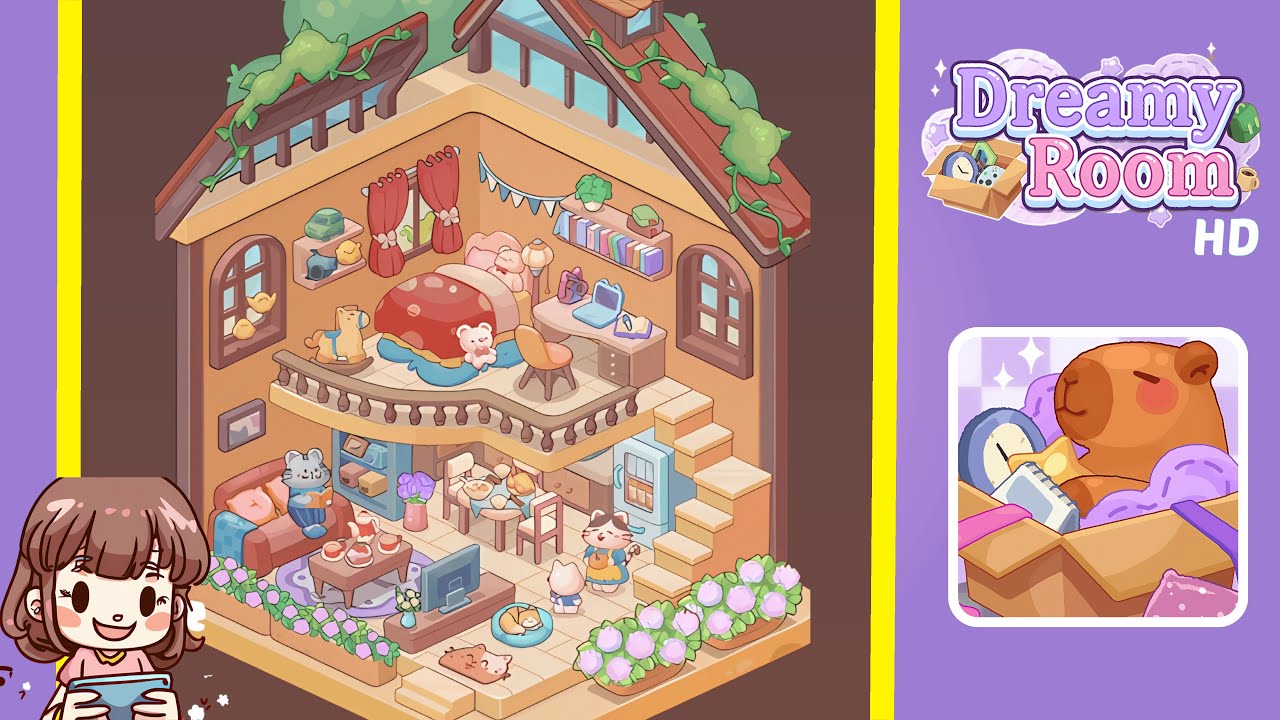
Step-by-Step Guide
- Place the base platform and front planters on the floor. Lay the pale cream floor platform in the center of the empty space, aligning the rounded front edge toward the player. Position two long rectangular planter boxes at the front-left and front-right edges and add a small curved step at the platform's center front.
- Build the two back walls and attach roof ridges. Erect two peach-colored back walls meeting at the center rear corner. Add vertical trim strips on the left and right edges, place roof ridges, and a triangular dormer. Drape green climbing-vine decorations along the outer roof edges.
- Position the curved upper platform and balcony railing. Install a second-floor platform jutting forward from the back wall. Fix the ornate balustrade along the curved edge and secure a set of three square steps at the right edge.
- Place the bed, bedding, and plush toys on the upper level. Center the bed on the upper platform with offset bedding. Hang red curtains, mount decorative shelves, and place a standing lamp and a rocking horse.
- Set the study desk, chair, and bookshelf on the right upper corner. Place a wooden desk, angle the chair slightly toward the balustrade, and mount a floating bookshelf with books and a plant. Drape bunting across the back wall.
- Add the kitchenette, dining table, and refrigerator on the lower right. Position the kitchenette, add a dining table with mismatched chairs, and fill a small shelving cubby with jars and containers.
- Furnish the living area: sofa, coffee table, TV, and rug on the lower left. Place a two-seater sofa, add a coffee table, set a purple circular rug, position the TV stand, and place a doormat near the entrance.
- Place the characters, pet bed, and small rugs in the lower center. Arrange anthropomorphic cat characters, place a pet bed, scatter decorative boxes, and add a side-shelf with a camera and picture.
- Add planter details, side decorations, and wall hangings. Populate planters with purple blossoms, mount framed pictures and stickers, and place a shelf with a radio under the upper platform.
- Final roofing plants, lighting checks, and tidy overlaps. Place rooftop greenery, add ambient lights, check for overlaps, and confirm all items are correctly positioned for a charming scene.
Notes & Precautions
- Align the base platform and upper balcony precisely to prevent items from floating or sinking.
- For accurate placement, nudge items in small increments to keep them within tile boundaries.
- Ensure stair placement does not overlap with the refrigerator to avoid glitches.
- If shelves and hangings don't snap to the wall, remove and reattach them with the wall selected.
- Save incremental versions to prevent loss of progress.
Tips & Tricks
- Begin with large structural pieces and finish with small decor using grid snapping for major pieces.
- Use a translucent placeholder for delicate items to preview sightlines.
- Rotate the chair and lamp slightly on the upper level for natural sightlines.
- Place shelves or table items starting from the back-most object to ensure nothing is obscured.
- Lock base and structural layers to prevent accidental moves while adding props.