Dreamy Room Level 286 Walkthrough
Welcome to Dreamy Room Level 286. This guide will assist you in crafting a cozy and visually appealing scene through precise object placement and alignment. Follow each step carefully to achieve the intended aesthetic design.
Step-by-Step Guide
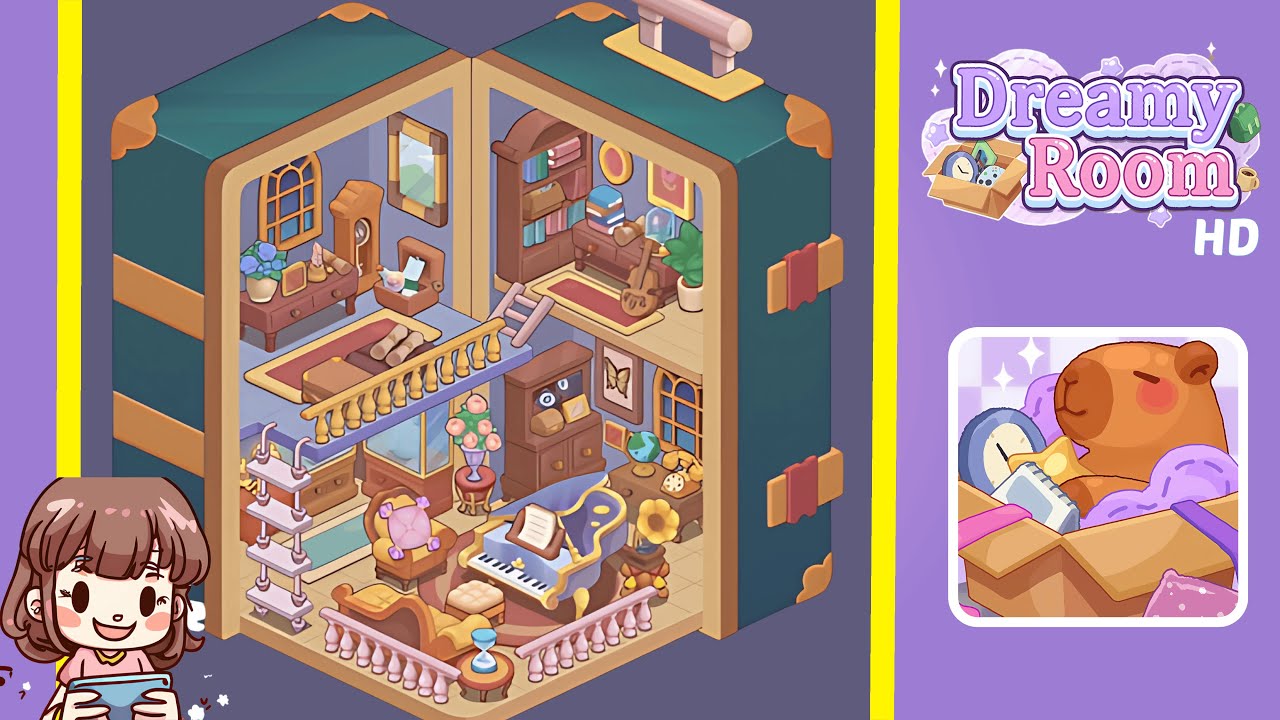
- Start by installing the floor and back walls: lay the creamy, square-tiled floor in the boot-shaped base and snap the two lavender back walls into place so they meet at the corner. Once the floor and walls are anchored, add the golden-beige doorway frame that outlines both front openings. This foundational step is crucial because every object you add references the floor grid and the frame edges for alignment. Double-check the floor grid lines and the frame’s outer lip — these guide where the pink balustrade and lower rug will snap later.
- Place the pink balustrade that wraps the front-left lower area and the short balcony rail above the center-left, visually separating the music area from the rest of the room. Ensure the railing sits flush with the floor edge for proper occlusion. Install the small wooden step against the inner corner wall, defining the landing that connects the lower music space to the lofted bedroom.
- Position the lavender grand piano with golden trim in the lower center-right area, angled so the keyboard faces left toward the seating. Add a small circular rug under the piano’s legs, aligning it with the balustrade posts. Place the loveseat, matching ottoman, round side table with hourglass, and plush armchair with a pink cushion around the piano and spiral shelf, creating a comfortable listening nook.
- Place the wooden cabinet with drawers and the record shelf on the lower-right wall, aligning them flush with the corner for consistent spacing. Position the vintage gramophone, globe, and glass display case accurately to set up the visual hierarchy. Ensure each piece snaps to the grid.
- In the mid-left alcove, place the dresser with two drawers, add the blue flower vase, and position the standing clock and arched window precisely. Add the jewelry box, decorative candle, and low rectangular rug with a trunk bench. Proper alignment prevents visual clashing with the balcony railing and ladder.
- Install the short ladder leaning from the mid-landing to the right loft. Place the tall bookcase, guitar, writing desk, and potted plant appropriately to form a quiet study loft. Ensure the loft floor piece fits snugly with the lower room’s railing edge.
- Add two arched windows, framed pictures, small music box, flower vase, and picture to complete the decorative accents. Arrange knickknacks precisely to enhance the visual storytelling.
- Review occlusion and shadows: Enable shadows, adjust overlaps, and ensure alignment for a polished final scene. Check that everything snaps cleanly to the grid.
Notes & Precautions
- Precision matters: ensure objects are snapped exactly to the designated tile or frame edge.
- Order matters: Place structural elements first, followed by large furniture and then small decor.
- Watch overlaps: Confirm each item’s footprint before locking placement to avoid clipping issues.
- Save often: Utilize incremental saves or previews to avoid losing placement progress.
- Lighting and scale: Preview at full screen to ensure the scene reads like the completed image.
Tips & Tricks
- Work modularly: Treat Dreamy Room Level 286 as separate zones, securing all items in one zone before proceeding to the next.
- Use symmetry: Align items relative to the central corner seam for balanced composition.
- Micro-nudging: Use tiny nudges to avoid clipping and achieve precise matching with the reference.
- Layer check: Inspect layers to ensure correct placement of tall and low furniture.
- Reference snapping points: Memorize key points on the floor for efficient return-to-position.