Dreamy Room Level 304 Walkthrough
Welcome to the Dreamy Room Level 304 walkthrough. This guide will lead you through the meticulous setup of the metro hub, ensuring every component is perfectly aligned and executed to create a seamless scene.
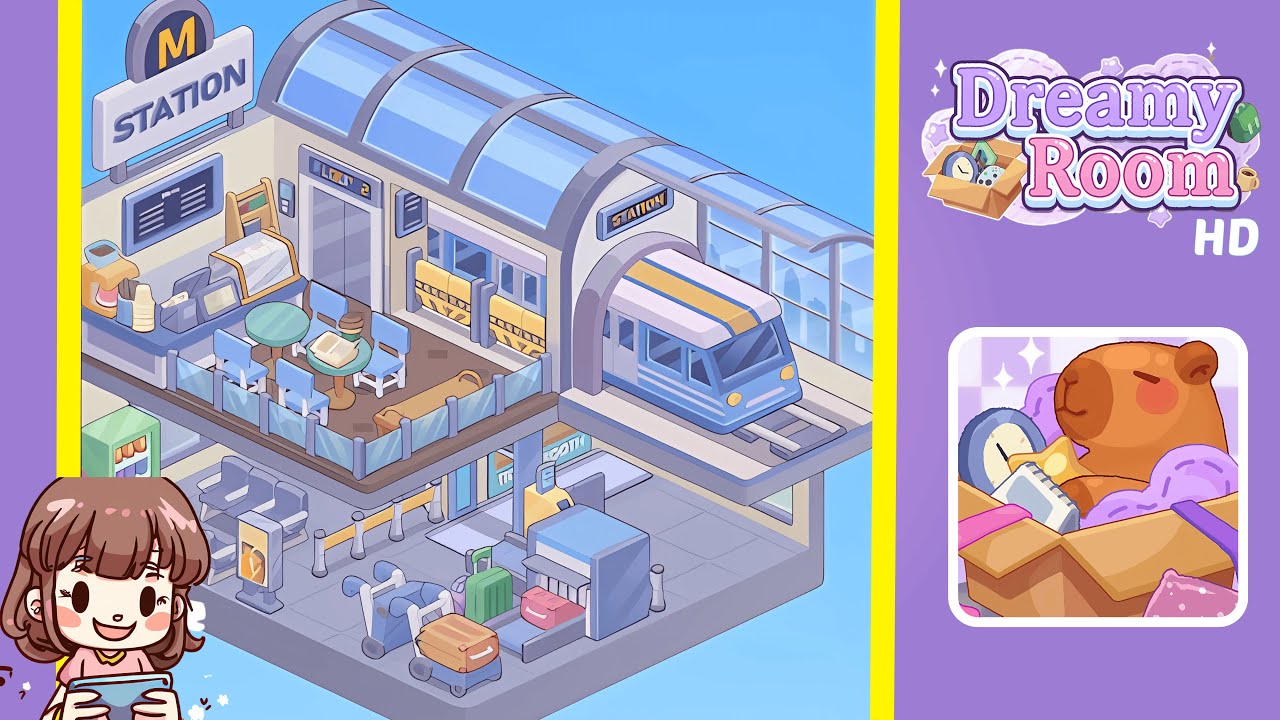
Step-by-Step Guide
- Place the curved glass roof on the upper right platform. Anchor the transparent arched roof module to the top-right corner of the second floor, ensuring the ribbed skylight aligns and sits flush with the exterior wall.
- Place the “STATION” arch and metro train at the far right. Slide the STATION-labeled stone arch under the roof, connect the short twin-rail track, and dock the metro train with its headlights facing right.
- Place the upper platform windows and yellow bench row along the top wall. Attach rectangular windows under the roof and install a bright yellow bench in front, centered between the train arch and the upcoming service door.
- Place the “FLOOR 2” doorway and frame. Set the gray service door labeled FLOOR 2 on the upper level, maintaining a narrow wall strip on both sides.
- Place the glass balcony railing around the mezzanine edge. Snap the transparent guardrail sections along the edge, ensuring the rail posts align correctly.
- Place the café counter, menu board, and coffee gear in the back-left of the upper floor. Build the coffee nook, pushing the L-shaped counter against the back-left wall.
- Place the round green table, four blue chairs, book, and small barrel. Center the mint-green table in front of the café and arrange the blue chairs, open book, and barrel neatly.
- Place the long wooden bench along the right interior wall of the mezzanine. Position the wooden bench parallel to the glass rail with a small gap for natural pathing.
- Place the ticket booth and entry door under the mezzanine (lower level, mid-right). Tuck the TICKET BOOTH façade under the balcony with proper alignment.
- Place the security scanner, conveyor, queue stanchions, and bin to the right of the booth. Assemble the luggage X-ray next to the booth while maintaining a clean process line.
- Place the vending machine and left waiting area. Snap the vending machine into the rear nook and arrange seating plus an ad stand for balance.
- Place luggage carts and suitcases at the front-right. Arrange the luggage zone with carts forming a loose triangular footprint in front of the scanner.
Notes & Precautions
- Confirm the frame color and curvature of similar-looking objects before placement.
- Follow the snap order: roof → arch → windows/bench → door → railings to prevent offsets.
- The upper table must center to the café; realign if it overlaps the counter or bench.
- The security lane requires a tile-wide aisle on both sides for proper appearance.
- Rotate and move stubborn items off the grid for resetting.
Tips & Tricks
- Start from the top-down, completing the mezzanine before the ground floor.
- Use story logic to guide sequences: enter → queue → ticket → security → wait → board.
- Align key elements symmetrically using the roof ribs as guides.
- Group props logically—book and barrel with the table, ad stand with seats—for clarity.
- Nudge luggage into a triangular arrangement for visual appeal before submitting.