Dreamy Room Level 288 Walkthrough
Welcome to the Dreamy Room Level 288 walkthrough. This guide will provide you with a step-by-step approach to successfully complete the level, ensuring every detail is perfectly aligned and arranged for optimal design and gameplay experience.
Step-by-Step Guide
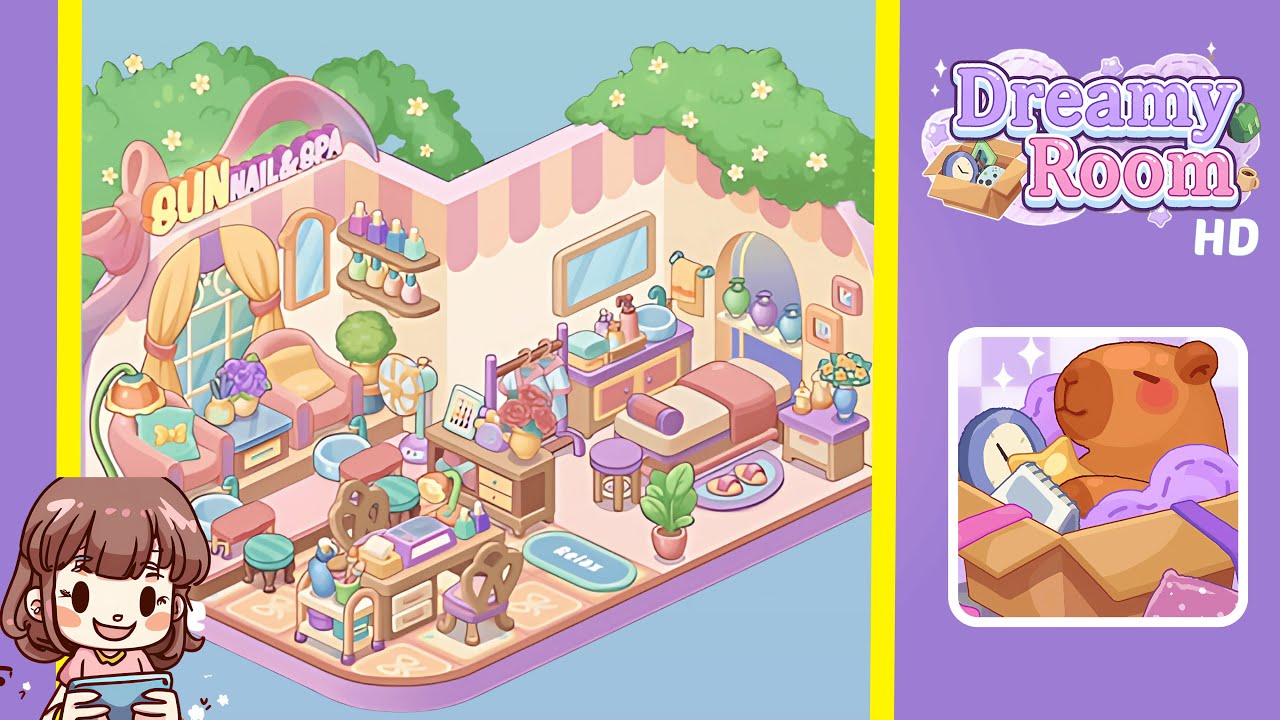
- Place the floor base tiles and pink platform. Begin by laying the base floor pieces. The patterned bow tiles occupy the left-front quadrant, while the smooth pale-pink platform fills the right-front quadrant. Ensure each patterned tile sits inside the lowered lip for correct alignment.
- Install the scalloped canopy and exterior sign. Attach the scalloped pink-and-cream canopy trim along the top of the back walls and place the curved ribbon arch sign over the left rear window, ensuring it is centered on the left roof peak.
- Build the left pedicure seating cluster. Place two pink pedicure armchairs along the left wall, staggered appropriately. Add a small side table with a purple potted flower and a green bow cushion. Position blue pedicure basins centered in front of each chair, with a fan and small stools slightly behind.
- Mount the wall shelving, mirror, and towel area. Position the tall rectangular mirror between the window and shelves. Place floating wooden shelves to the right of the mirror, stocked with pastel nail polish bottles. Align the towel rack near the transition to the right wall for continuity.
- Assemble the central nail desk and seating. Place the central nail desk so the operator faces the back wall, with ornate chairs opposite. Add a cash register, lamp, and polish bottles on the desk, and a "Relax" mat to the right of the desk area for seamless floor cohesion.
- Fit the right spa bed, sink cabinet, and arch niche. Install the spa bed on the pale-pink platform, with a small purple stool at its foot. Position the sink cabinet with mirror to the left, ensuring alignment with the horizontal mirror, and arrange decorative vases and framed picture in the right-back corner.
- Add plants, rugs, and small accessories. Populate the room with accessories such as a tall green plant, pink slippers, small rugs, drawer chest, and decorative prints. Arrange bottles, lotions, towels, and small items on counter surfaces for a lived-in appearance.
- Final alignment pass and shadow checks. Perform a finishing pass, adjusting chairs, pedicure basins, and other elements for consistency in perspective and scale. Ensure lighting and shadows align for professional visual coherence.
Notes & Precautions
- Placement precision is crucial, as small offsets can lead to misaligned furniture.
- Move grouped items together to maintain relative spacing.
- Avoid deep overlapping; objects should lightly overlap as per reference.
- Disable grid snapping if needed for micro-alignment.
- Save frequently to prevent issues from misplaced items.
Tips & Tricks
- Work left to right when placing large clusters to anchor scale.
- Use a two-pass method: major shapes first, then micro-placement.
- Rotate vases and bottle labels for consistent lighting reflections.
- Duplicate and mirror items for symmetry, saving time.
- If stuck, use a reference overlay to compare object placements.