Dreamy Room Level 294
Welcome to the Dreamy Room Level 294 walkthrough. This guide will help you accurately place each item to recreate the enchanting scene.
Step-by-Step Guide
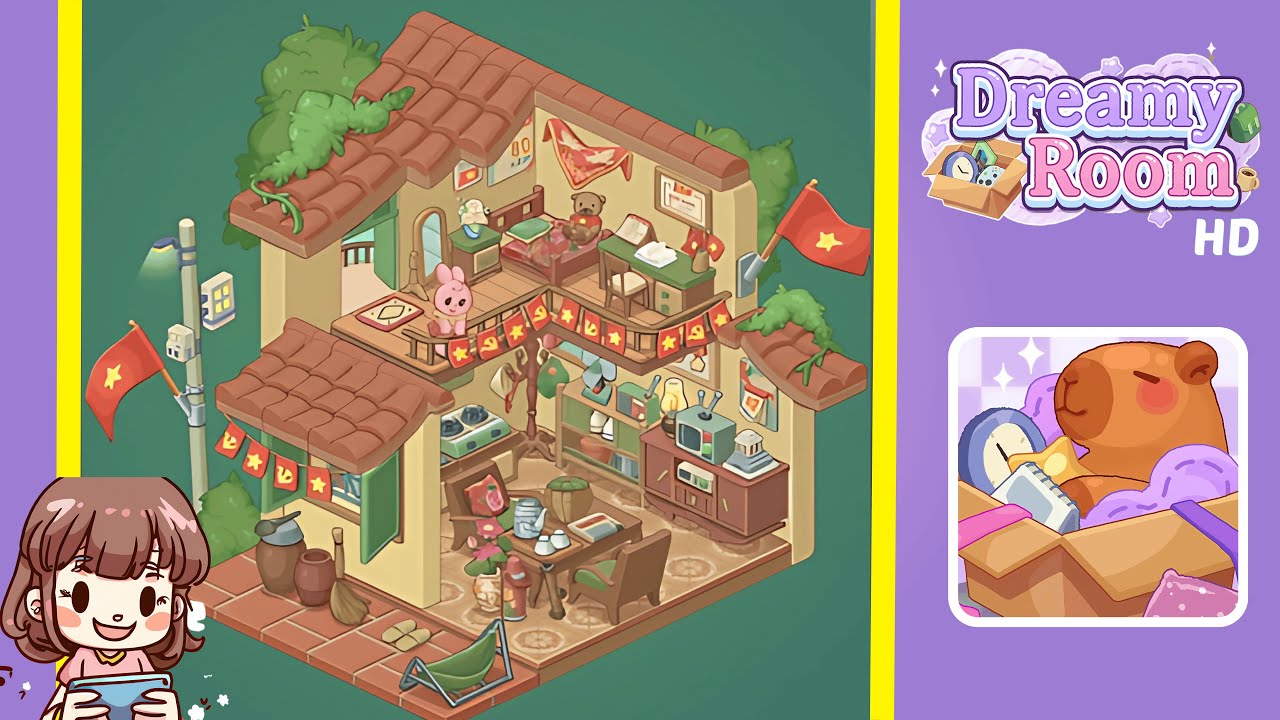
- Place the tiled roof sections and exterior greenery on the top-left and top-right roof edges. Begin with the terracotta roof sections that cap the left and right upper walls. Align the larger left tile with its curved ridge in the upper-left interior corner and the vine-like shrub trailing toward the center. Ensure the right tile covers the upper-right wall inset, with the small plant tuft peeking over. This alignment ensures the hanging bunting and upper balcony railing align correctly. Adjusting the roof tiles precisely prevents future clipping issues.
- Install the green folding shutters and open doorway at the left wall entrance. Place the shutters half-open; the left shutter folds outward low on the wall, and the right slightly inside the doorway. Position the recessed entry so the small rug at the doorstep lies flush with the interior floor tile. Ensure the doorway's top edge is directly below the left roof tiles for correct shadowing and scale.
- Lay the floor tiles, front sidewalk, hammock frame, and doorstep objects. Place the patterned interior tiles parallel to the right wall. Align the terracotta sidewalk slab with the doorway, placing slippers and a broom on it. Position the hammock frame in the lower-left corner with the hammock sagging toward the viewer. Place ceramic water jars, broom, dustpan, and straw slippers by the doorway.
- Arrange the living room set: low tea table, two chairs, potted plants, and patterned armchair. Centrally position the tea table on the patterned tiles with a teapot, three cups, and open magazine/book. Place one chair to the lower-right of the table and the other angled to the left for natural conversation. Add a tall floral vase and a smaller jar near the table. Slide the patterned armchair against the left internal wall, facing the tea table.
- Populate the kitchen corner with the two-burner stove, shelving unit, radio/TV cabinet, and countertop appliances. Position the stove against the left side of the back-right room wall, with shelving to its right. Stack pots, bowls, a desk fan, and a folded towel on the shelves. Set the TV/radio cabinet to the far right, with the TV on top and papers/boxes next to it, along with a small lamp.
- Add the coat rack, wall hangings, wall posters, and balcony bunting with flags. Position the coat rack near the center back wall. Hang a straw hat and green satchel on opposite pegs. Drape the red banner with yellow symbols along the upper balcony railing. Place the framed posters on the upstairs back wall, and add the Vietnamese national flags on exterior poles.
- Furnish the upper floor: bed, bedside table, mirror, desk, and pink bunny plush. Position the bed against the back wall on the upper landing with the teddy bear at the head. Place a low bedside table with a vase of flowers beside it. Set a mirror near the doorway aligning with the landing rug. Position the desk and chair to the far right, with an open book, folded paper, and pencil-holder on it. Place the pink bunny plush on the balcony railing.
- Final touches: streetlamp, exterior flag pole, small roof vines, and lighting accents. Set the streetlamp at the front-left corner, the lightbox above the sidewalk. Attach the junction box and vertical pole with the exterior flag behind the streetlamp. Tuck in the remaining roof vines over the right and left roof edges. Add warm lamp glows to complete the scene.
Notes & Precautions
- Placement priority is key: start with large elements like roofs and walls, then move to medium furniture, finishing with small props.
- Depth order is crucial: ensure objects like bunting and plush toys have the correct layering to avoid clipping.
- Prevent overlap collision by aligning tiles, roofs, and walls for precise snapping.
- Save often if possible to preserve progress during micro-adjustments.
Tips & Tricks
- Work in zones: divide areas into exterior, ground-floor, and upper-floor for consistent visual alignment.
- Use rotate/flip tools sparingly for minor adjustments without causing clipping.
- Utilize snap-to-grid for large elements; disable it for precise placement of small props.
- Check layers after placing items: use zoom or overview to ensure correct depth.
- Memorize anchor points like bedside table corners and sidewalk seams for efficient placement.