Dreamy Room Level 201 Walkthrough
Welcome to the comprehensive guide for Dreamy Room Level 201. In this level, you will transform an empty printer-shaped canvas into a fully realized print shop. This level presents a spatial puzzle that challenges you to precisely place each object, including flooring, furniture, and décor, to tell a charming story. The main challenge is deducing the correct placement for every item. Follow the step-by-step guide below to complete Dreamy Room Level 201 with ease.
Step-by-Step Guide
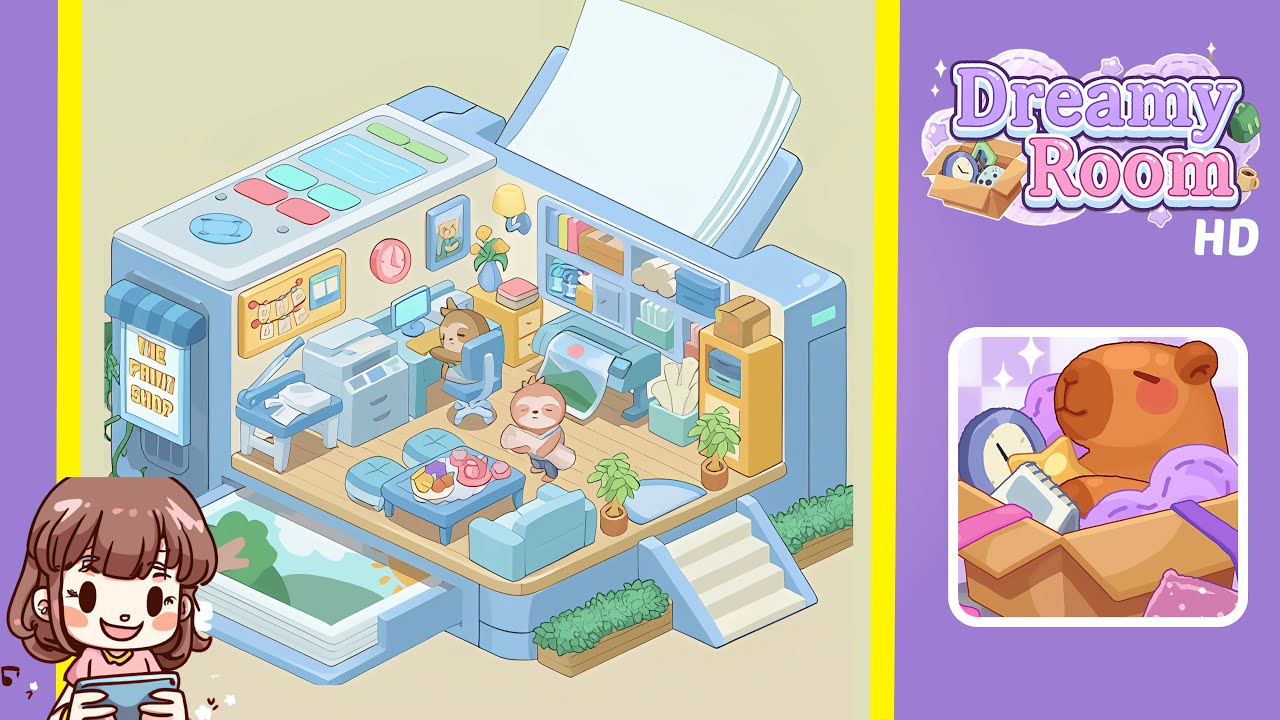
- Place the wooden floor panel in the center of the room. Select the rectangular plank and align it in the geometric cavity at the base. Ensure the wood grain runs parallel to the edges, filling the floor space completely.
- Place the print output tray in the front left corner. Position the tray below the left “shutter” opening, ensuring the top sheet aligns with the room’s front edge.
- Place the multifunction printer and paper cutter bench in the left interior corner. Position the gray printer in the back left corner and the paper cutter to its right. Ensure no overlap or blockage of the output tray.
- Place the desk, computer, and swivel chair against the back wall. Position the desk centrally, arrange the monitor and keyboard on top, and slot the chair slightly overlapping the floor panel.
- Place decorations on the back wall. Position the shelving unit on the right, attach the lamp above and to the left, and add the picture frame, vase, and clock for a cohesive display.
- Place the large-format printer roll machine next to the shelves on the right side. Ensure it sits beneath the shelves without overlapping.
- Arrange seating area furniture in the front right interior. Position the sofa facing the coffee table, place stools around the table, and set the tea set and fruit bowl on top.
- Place the sloth characters in their respective work and presentation spots. Position the seated sloth behind the desk and the standing sloth near the coffee table, facing the entrance.
Notes & Precautions
- Zoom out occasionally to review your layout; close-up adjustments can skew your perception.
- Overlapping objects usually lock them into an invalid state, so reposition carefully to avoid clipping.
- Use the snapping guides for perfect alignment, indicated by a subtle green glow.
- When rotating curved items, use small increments (5° or less) to avoid misalignment.
- If an item is misplaced, use the undo button to avoid tiny offsets from manual adjustments.
- Focus on storytelling: balance functional placement with visual harmony.
Tips & Tricks
- Hold the shift key while dragging to snap objects to a hidden grid for faster placement.
- Use the rotate handle for slight tweaks, moving one degree at a time for flush walls.
- If an object appears behind another, right-click to bring it to the front.
- Use Ctrl+C and Ctrl+V to duplicate items, maintaining exact spacing.
- Toggle spotlight preview to reveal hidden misalignments.
- Save drafts of your layout before adding final décor.
- Position sloths near interactive objects to trigger animations confirming correct placement.