Dreamy Room Level 224 Walkthrough
Welcome to Dreamy Room Level 224. This level challenges your skills by requiring precise placement of various objects to create a harmonious zoo environment. Follow this guide for the correct steps to complete the level successfully.
Step-by-Step Guide
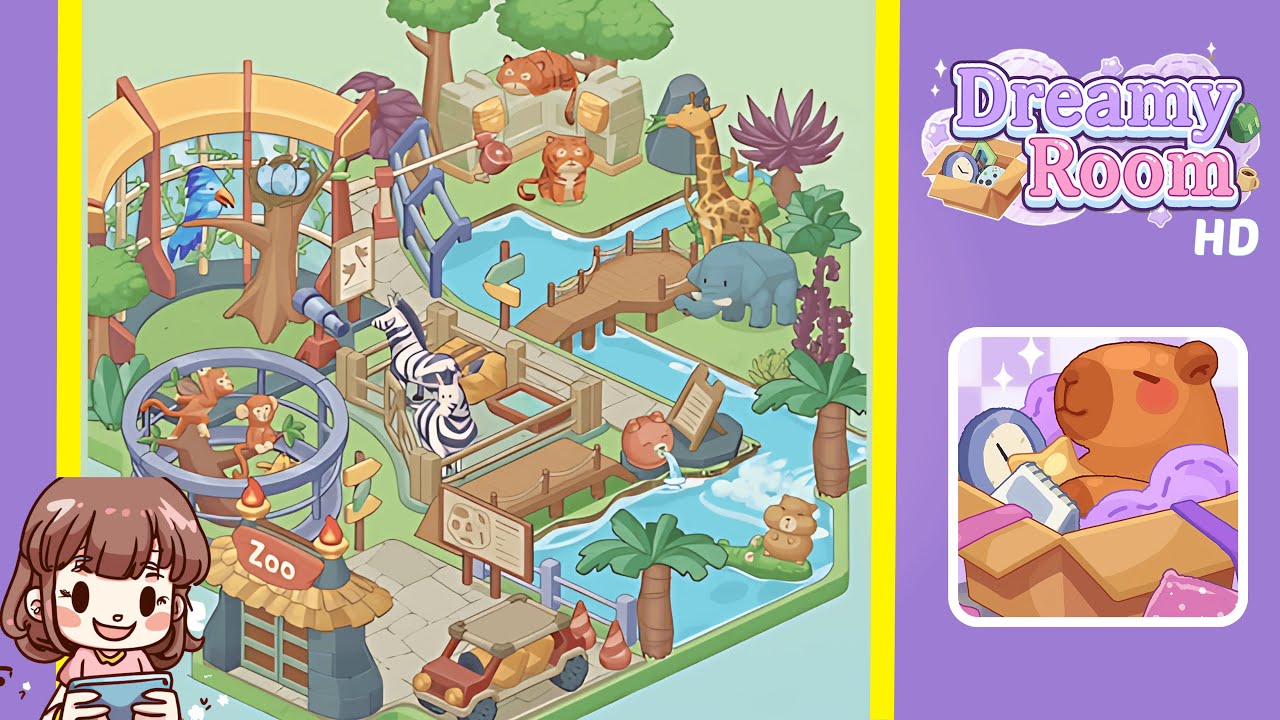
- Place the Zoo Entrance Gate in the lower-left corner. Open your décor menu, select the thatched-roof "Zoo Entrance" gate, and drag it onto the stone pavement. Ensure the "Zoo" sign faces inward along the path.
- Place the Monkey Enclosure and Monkeys by the curved walkway. Select the circular enclosure and position it so its base touches the grass, with its railing hugging the curve of the path without intruding on the water channel. Place the two monkey figurines on either side of the central tree trunk, facing inward.
- Place the Zebra Pen with Zebras, Hay Bale, and Trough along the central stone walkway above the monkey cage. Align the pen's fences with the path edge, position the zebras inside, and place the hay bale and trough accordingly.
- Place the Bird Aviary, Nest, and Blue Parrot in the upper-left area. Align the aviary's vine-covered supports above the zebra pen. Position the nest on a branch inside the aviary and place the blue parrot on the leftmost branch.
- Place the Tiger Enclosure, Walls, Catapult, and Trees on the upper plateau. Arrange the stone wall segments side by side with the log faces outward. Place the catapult in front of the middle wall segment and position the tigers and trees appropriately.
- Place the Giraffe, Rock, and Purple Agave Plant on the right bank. Position the giraffe on the grassy plot near the water. Place the rock behind the giraffe and the agave plant adjacent to the rock.
- Place the Elephant and Additional Plants on the mid-right area. Position the elephant beside where the footbridge will go, with the trunk toward the water. Place the fern cluster and purple flower stalk behind the elephant.
- Place the Wooden Bridge and Directional Signpost over the water channel. Align the bridge beams across the channel, ensuring it's flush on both ends. Place the signpost to the left of the bridge entrance.
- Place the Pig Fountain and Informational Signboard by the zebra pen. Align the fountain at the right edge of the zebra pen, with its spout pouring into the waterway. Stand the signboard next to the fountain.
- Place the Bear Floatie and Palm Tree in the lower-right water pool. Ensure the floatie sits on the water's surface. Position the palm tree beside the pool.
- Place the Off-road Vehicle and Traffic Cones on the stone-paved area. Position the buggy on the platform and place the traffic cones behind its rear wheels.
- Scatter Remaining Palm Trees and Decorative Foliage. Fill empty grass patches with leftover decorations without obstructing pathways or water edges. Adjust any misaligned objects to finalize your zoo layout.
Notes & Precautions
- Check grid alignment before confirming placements to avoid blocking pathways or visual glitches.
- Be cautious with object rotation; incorrect angles can cause errors.
- Make sure tall items like giraffes and trees are flush with the terrain grid.
- Avoid overlapping decorations to prevent score reductions due to shadows or occlusions.
- If a drop isn't recognized, nudge the object one grid square at a time.
- Save progress before placing final objects to prevent losing arrangements due to misclicks.
- The main challenge is determining the correct placement; take your time with spacing and orientation.
Tips & Tricks
- Visualize each exhibit footprint to plan your layout and avoid backtracking.
- Use the swap tool to exchange similar props quickly.
- Practice with small plants to master snapping points for larger builds.
- Zoom out for a bird’s-eye view to catch misaligned objects.
- Save often to prevent lost progress from accidental drags or deletions.
- Use the undo button if you misplace a key prop.