Dreamy Room Level 209 Walkthrough
Welcome to the detailed guide for conquering Dreamy Room Level 209. Follow the steps carefully to achieve the intended design and functionality of this unique gaming level.
Step-by-Step Guide
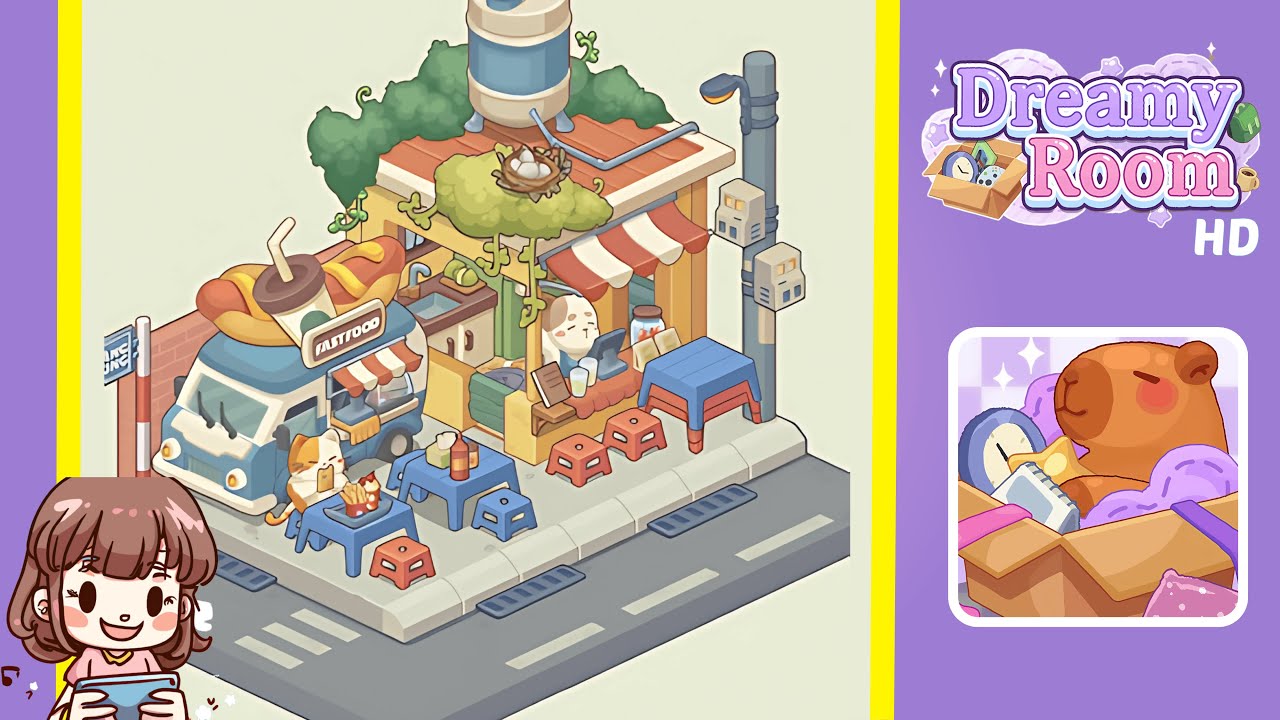
- Place the Fast Food Truck in the left corner of the level. Align the small blue and white mobile food truck, topped with a giant hot dog and drink, so that the front bumper sits flush against the sidewalk curb. Ensure the oversized hot dog aligns with the street edge, with the roof garnish centered above the driver’s seat window.
- Affix the “Hang Rong” Sign and Brick Accent on the left boundary area. Slide the narrow brick panel piece to cover the blank yellow wall area, aligning flush with the sidewalk edge. Rotate and insert the “Hang Rong” signpost perpendicular to the wall, ensuring it stands firmly for an immersive presentation.
- Install the Red-and-White Striped Awning over the stall. Align the striped fabric awning above the wooden service counter so the rear edge rests flush against the yellow wall and the front edge extends evenly. Rotate the support poles to 45 degrees, tucking them neatly under the awning.
- Build the Wooden Service Counter and Sink Unit beneath the awning. Align the wooden counter model with storage cabinets and a countertop sink flush against the back wall, ensuring a seamless transition between indoors and outdoors. Adjust the sink basin for outward faucet visibility.
- Mount the Blue Water Tank on the Roof. Position the blue and beige cylindrical water tank atop the tiled rooftop, ensuring stability by having its supporting legs straddle the roof edge. The tank’s inlet pipe should point toward the building’s interior wall.
- Add Vines and the Leafy Egg Nest on the rooftop. Use multiple vine strands to create a natural canopy effect over the rooftop and awning supports. Place the nest containing three white eggs atop the densest leaf cluster for a charming focal point.
- Arrange Street Tables and Stools on the Sidewalk. Place three small plastic tables and matching stools in blue and red along the sidewalk edge next to the truck, in front of the counter, and near the lamppost area. Ensure correct alignment with pavement grooves for realism.
- Place the Cat and Fast Food Items on the Tables. Position the cheerful orange-and-white cat figurine at the table adjacent to the truck. Add a plate of golden fries and a milkshake in front of the cat. Adjust head tilt for a natural food interaction simulation.
- Add Condiment Bottles and Jars on the Counter. Position ketchup and mustard squeeze bottles, along with glass jars of pickled ingredients, on the service counter for easy customer reach. Rotate them for branding visibility, balancing space for additional props.
- Position the Lamppost and Electrical Boxes. Place the tall streetlight post on the right sidewalk edge and attach two small electrical boxes stacked vertically on its lower half. Rotate the lamp head slightly toward the sidewalk for optimal illumination.
Notes & Precautions
- Even minor misalignments can affect the aesthetic outcome, so use grid snapping when available.
- Avoid excessive rotation of small props, which may lead to clipping issues.
- Use the interactive layering system to adjust item depths if objects disappear behind others.
- Save progress periodically to prevent data loss during adjustments.
- Preview lighting and camera angles to ensure all details are visible and correctly positioned.
Tips & Tricks
- Plan strategically and organize frequently used items into a quick-access favorites list.
- Place larger structural pieces first to reduce hidden collision issues.
- Use small positional nudges rather than rotation for vines and the egg nest to avoid clipping.
- Practice zooming in and out for micro-alignments and overall composition checks.