Dreamy Room Level 87 Walkthrough & Guide
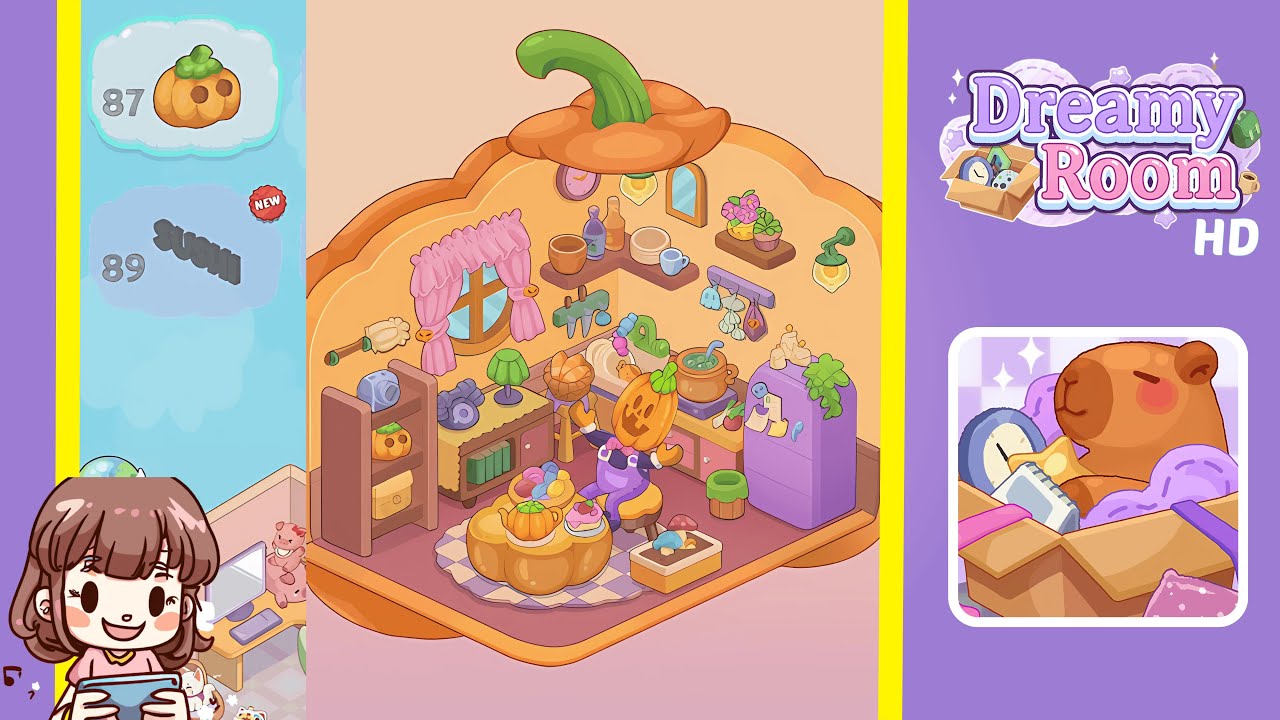
Welcome to this step-by-step guide for Dreamy Room Level 87! In this level, your objective is to transform an empty pumpkin-shaped room into a cozy kitchen scene. The main challenge is arranging each object perfectly to recreate the charming autumn-themed decor. Follow these steps carefully to master Dreamy Room Level 87.
Step-by-Step Guide
- Place the Wooden Rolling Pin on the Left Wall Hooks: Start by mounting the wooden rolling pin with pumpkin-shaped handles on the two green hooks centered on the left wall. This sets the autumnal kitchen mood.
- Add the Tall Wooden Bookshelf and Populate Its Shelves: Position the three-shelf wooden unit flush against the left wall floor. Top shelf: place the orange pumpkin-shaped bag. Middle shelf: arrange the vintage purple camera on the left and the green leaf-style table lamp on the right. Bottom shelf: line up the three green-spined books neatly.
- Lay the Checkered Rug and Position the Pumpkin Coffee Table: Place the circular gray-and-white checkered rug in the center of the floor, and set the pumpkin-shaped coffee table directly on top.
- Decorate the Coffee Table Surface: On the coffee table, place a miniature pumpkin decoration on the left, a bowl of mixed fruit on the back, and a pink-frosted pastry cake on the right.
- Position the Planter Box with Mushroom: Place the small rectangular planter box containing the blue-and-red mushroom on the floor to the right of the rug.
- Add the Bread Basket Stool: Move the wooden bar stool to the left of the counter and place the wicker basket with the braided loaf of bread on top.
- Install the Window and Pink Curtains: Mount the round-pane window on the left wall and drape the pink curtains with pumpkin tie-backs on either side.
- Mount the Corner L-Shaped Shelf and Arrange Tableware: In the back-left corner, attach the L-shaped shelf. Then place two bottles, a wooden serving bowl, a stack of plates, and a white coffee mug.
- Hang Wall Clock, Heart Lamp, and Mirror: Above the corner shelf, install from left to right: the vintage purple wall clock, the dangling heart-shaped lamp, and the small oval mirror with a blue frame.
- Add Floating Succulent Shelf and Right-Wall Sconce: On the right wall, fix the small wooden shelf and set the potted succulent on it. Below, mount the wall sconce with the green base.
- Place the Pastel Purple Fridge and Decorate It: Slide the pale purple fridge flush against the right wall, affix sticky notes, and drape the trailing succulent vine over the edge.
- Set the Green Bin Next to the Fridge: Position the green bin to the right of the fridge to complete the right-wall grouping.
- Install the Kitchen Counter Along Back and Right Walls: Snap the brown countertop pieces into place around the back-left corner and along the right wall.
- Attach Knife Rack, Hang Garlic, and Ghost Bag: Above the counter, mount the purple magnetic rail with knives, hang garlic bulbs and a purple tote bag side by side.
- Place the Sink, Faucet, and Hose: Slot the sink into the countertop, attach the green swan-neck faucet, and coil the hose around its base.
- Add the Cutting Board with Sliced Bread: Lay down the wooden cutting board to the left of the sink, and arrange the sliced bread pieces on top.
- Install Under-Counter Drawers, Pot, and Strawberries: Click in the drawers under the counter, place the brown soup pot and scatter two strawberries beside it.
- Final Placement Check: Walk through the level to ensure every item matches the completed image's locations. Double-check alignments and spacing for a perfect cozy kitchen.
Notes & Precautions
- No Timer: The level is untimed; focus on accuracy over speed.
- Snap-to-Grid: Objects will "snap" into slots; nudge slightly if necessary.
- Overlap Issues: Some items may collide if placed too close; adjust with the drag tool.
- Undo Button: Undo placements if an object lands incorrectly.
Tips & Tricks
- Left-to-Right Workflow: Place objects starting on the left wall, moving clockwise.
- Group Similar Items: Populate a single shelf or surface in one go.
- Use Visual Anchors: Align edges flush using green hooks and countertop edges as guides.
- Camera Zoom: Zoom in for fine adjustments, especially for hanging items.
- Save Progress: Save mid-level if available to preserve your layout.