Dreamy Room Level 85 Walkthrough & Guide
Below is a complete walkthrough for Dreamy Room Level 85, guiding you step by step from the empty box to the fully decorated music-and-cozy themed space. The main challenge in Dreamy Room Level 85 is determining the perfect placement for each object to recreate the scene exactly.
Step-by-Step Guide
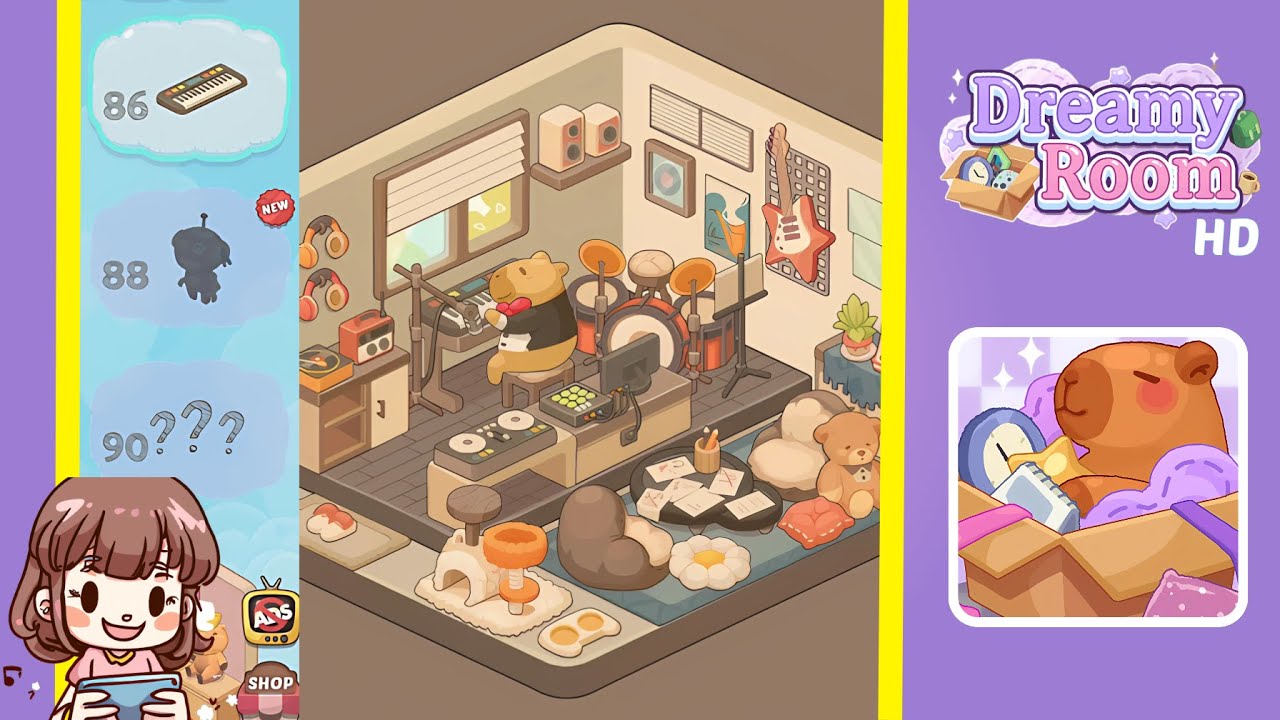
- Place the wooden cabinet in the bottom-left corner. Position the low, two-door wooden cabinet snugly into the left corner of the platform’s front edge. This anchors the left side of Dreamy Room Level 85.
- Place the potted plant on the left side of the cabinet. Set a small green plant in a white pot atop the left edge of that wooden cabinet to add a splash of life.
- Place the record player on the right side of the cabinet. Add the orange-accented turntable with a spinning vinyl on the cabinet’s right side. Align it so the tonearm faces inward.
- Place the orange radio next to the record player. Slide the compact vintage radio immediately to the right of the record player, completing your retro audio corner.
- Hang the two pairs of headphones on the left wall. Attach the orange headphones just above mid-wall and the red-accented pair slightly lower—both on the left wall.
- Install the window blinds above the cabinet. Place the cream roman shade directly above the cabinet, covering the window frame exactly as seen in Dreamy Room Level 85.
- Place the synthesizer workstation at center-left of the platform. Drag in the keyboard setup so it sits flush with the front edge, slightly left of center, forming the first musician’s station.
- Seat the tuxedo bear on the stool in front of the synthesizer. Position the little yellow bear wearing a bow tie on the matching stool, facing the keys, for the main performer.
- Place the drum kit against the back wall, centered. Move in the multi-piece drum set directly behind the synth station, centering it on the back wall for the rhythm section.
- Position the microphone stand to the right of the drum kit. Slide the tall mic stand just to the drum kit’s right, angled slightly toward center stage.
- Mount the speaker shelf on the left wall near the corner. Attach a simple floating shelf about two-thirds up the left wall, right beside the corner, to hold pro audio gear.
- Place the pair of beige speakers on that shelf. Place the square, dual-driver speakers side by side on the shelf, facing inward for the perfect mix monitors.
- Hang the framed record artwork to the right of the speakers. Hang the square frame with a vinyl cover print just to the right of the speaker shelf, aligned at the same height.
- Hang the abstract poster below the framed record. Place the colorful, fluid-pattern poster slightly lower and to the right, filling the wall space.
- Install the HVAC vent grille on the right wall above guitar height. Affix the horizontal vent panel near the top of the right wall to balance airiness.
- Mount the grey pegboard behind the guitar on the right wall. Attach the rectangle pegboard centrally on the right wall, creating the backdrop for the star guitar.
- Mount the red star guitar onto the pegboard. Hang the angular, red-white electric guitar on its peg hooks at an angle matching the complete scene.
- Hang the two blank frames to the right of the pegboard. Hang two simple rectangle frames side by side, aligned horizontally, on the right-hand wall.
- Hang the two vinyl record discs to the right of the blank frames. Place the pastel green and pastel pink discs in a vertical stack to finish the vinyl-wall detail.
- Place the small side table on the right platform. Set the narrow, four-legged table against the right wall on the raised platform to start your side vignette.
- Place the calendar and plant atop that side table. Add the desk-style flip calendar showing “30” and a tiny succulent next to it, matching the finishing touches.
- Place the DJ turntable and mixer station at front-center. Position the double-deck turntables and central mixer table exactly at the front edge of the platform, creating the DJ booth.
- Position the computer monitor and grid controller on the DJ station. Place the flat-screen monitor behind the decks and the pad-style grid controller in front of it, completing your digital station.
- Place the white arch cat scratcher on the front-left of the platform. Drag the cave-style scratcher to the front platform’s left corner, ensuring it’s flush with the edge.
- Place the orange scratching post next to the white arch. Set the tall, fluffy perch directly to the right of the arch, forming the cat play area.
- Place the feeding bowls with eggs in front of the scratchers. Position the double-dish bowl filled with two egg shapes right in front of the scratching posts for that cozy pet detail.
- Arrange the sushi tray on the front-left platform beside the arch. Place the small grey tray holding two sushi pieces just outside the cat zone.
- Place the small round wooden stool to the left of the DJ station. Slide the single-leg stool under the platform’s front edge, next to the white arch, for that extra seating.
- Place the black coffee table with papers and pencil holder in the floor rug center. Set the low circular table on the blue rug, then arrange the scattered sheets with red X marks and the pencil pot on top—key scene details.
- Place the brown and white heart beanbags plus daisy cushion around the coffee table. Arrange the two heart-shaped beanbags (one brown, one cream) and the daisy-shaped floor cushion around the table exactly as seen.
- Place the teddy bear plush and orange cushion to the right of the coffee table. Position the beige teddy with a bow and the little orange cushion side by side on the rug’s right edge to finish the cozy corner.
Notes & Precautions
- No timer: Dreamy Room Level 85 imposes no countdown—take your time to match placements exactly.
- Layer ordering: Always drop background wall items (posters, pegboard) before adding props in front (guitar, headphones) to avoid occlusion mistakes.
- Snap zones: Use the game’s subtle snap guides to ensure alignment—objects slightly off-grid will break the aesthetic.
- Overlap: Watch for overlaps on the platform border—props must sit fully within the platform footprint.
Tips & Tricks
- Pattern recognition: Grouping similar shapes (vinyl discs, frames) speeds up the hang-and-place process.
- Use preview mode: Toggle the preview grid to verify spacing before releasing each object.
- Bookmark clusters: If you struggle with the music corner density, place larger furniture first (cabinets, tables), then fill in small items (plants, records).
- Undo selectively: Use the undo feature liberally when an item snaps just off-center.
- Screenshot reference: Keep a snapshot of the final scene on your second screen to cross-check colors and angles.