Dreamy Room Level 81 Walkthrough
Welcome to the ultimate Dreamy Room Level 81 walkthrough, where you’ll transform an empty two-tiered space into a cozy, activity-packed haven. This detailed guide breaks down each object’s placement, ensuring you nail the placement challenge as you arrange every item exactly as shown in the completed image—from the red sports car in the lower garage nook to the trailing vine planters by the upper railing. Follow the steps below and observe closely to master this level’s satisfying design puzzle.
Step-by-Step Guide
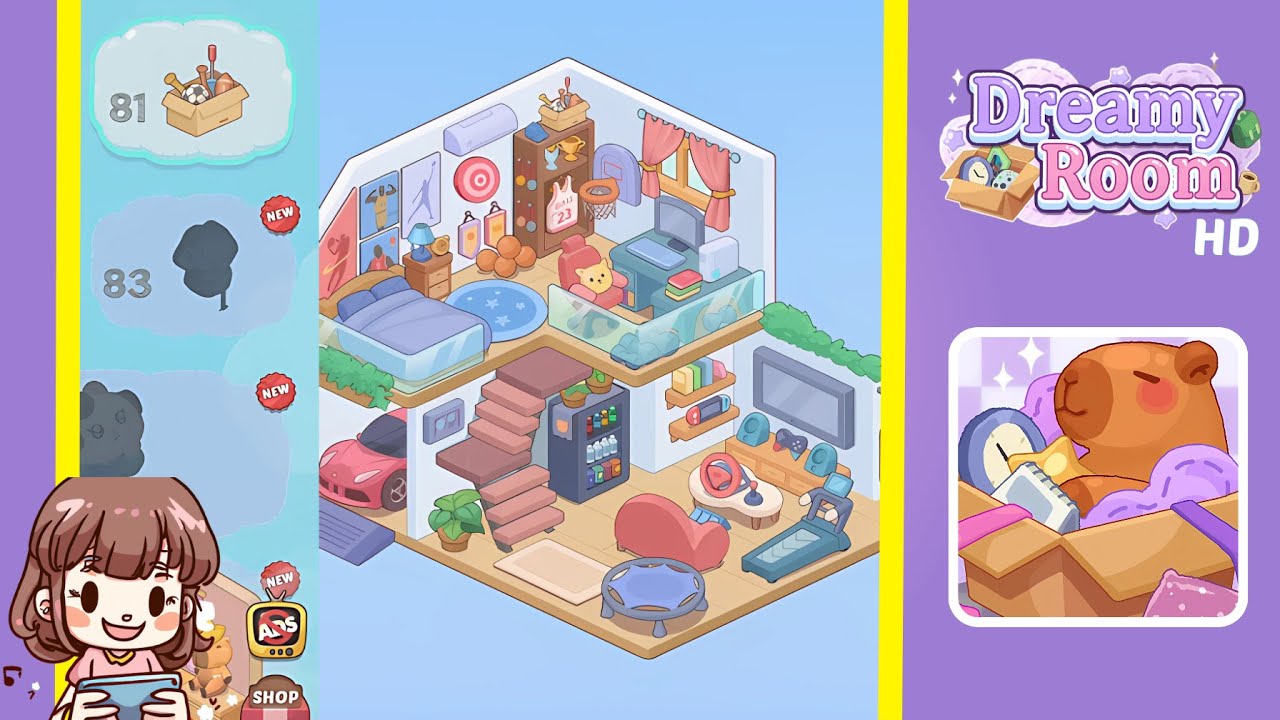
- Place the red sports car in the garage nook. Position it snugly in the left lower corner, facing outward to fill the garage alcove.
- Place the potted plant beside the ramp. Position the leafy green plant beside the car ramp to soften the garage entrance.
- Install the wooden staircase under the upper level. Align each step flush with the walls for smooth climbing.
- Place the black mini fridge next to the stairs. Slide it tight against the staircase, facing outward for easy access.
- Hang the framed cassette art above the fridge. Center it on the wall to balance the lower zone décor.
- Position the red heart-shaped couch in front of the stairs. Face it toward the center to create a cozy lounging spot.
- Place the small round trampoline to the right of the couch. Leave enough clearance for jumping without clipping the couch.
- Set up the coffee table with steering wheel and joystick. Center the gaming table in front of the couch for immersive play.
- Place the treadmill against the right wall. Leave a gap for the punching bag beside it.
- Hang the red punching bag near the treadmill. Ensure the stand is stable and the bag swings freely.
- Position the wooden TV stand against the lower right wall. Center it directly under where the TV will go.
- Place the flat-screen TV on the stand. Make sure it’s aligned and won’t tip over.
- Arrange the two game controllers on the shelves. Keep them within easy reach for quick gaming sessions.
- Set up the pastel blue bed on the upper left platform. Push it into the corner against the walls.
- Place the wooden nightstand next to the bed. Align its edge flush with the mattress.
- Add the blue lamp and yellow alarm clock on the nightstand. Space them evenly for balanced bedside lighting.
- Hang the sports poster gallery along the left upper wall. Space each poster evenly from floor to ceiling.
- Install the white air conditioner unit above the posters. Center it on the wall for a symmetrical look.
- Lay the round star-patterned rug beside the bed. Position it so half sits under the bed and half on the floor.
- Place the three basketballs in a neat cluster next to the rug. Group them close together for a playful touch.
- Position the wooden wardrobe on the upper back wall. Slide it to the right of the staircase opening.
- Place the gold trophy and hat box atop the wardrobe. Balance the box next to the trophy for a tidy display.
- Hang the white “Bulls 23” jersey and medals from the wardrobe hooks. Ensure the jersey drapes naturally and medals dangle visibly.
- Mount the red and white target board on the wall left of the wardrobe. Center it at eye level for easy aiming.
- Attach the basketball hoop above the wardrobe. Clip the net so it swings freely below.
- Set up the green computer desk on the upper right platform. Align it flush against the right wall.
- Place the monitor, keyboard, and CPU on the desk. Stack the books to one side as shown.
- Position the red swivel armchair beside the desk. Add the cat pillow on the seat for a cozy detail.
- Install the glass railing along the upper edge. Place the dumbbells behind it on the floor.
- Decorate with hanging vine planters along the railings. Drape the leafy vines to soften the edges and add greenery.
Notes & Precautions
- Be mindful of spacing and alignment. If objects clip through walls or each other, the game may not register correct placement.
- Always snap furniture elements fully against the floor or walls before moving on.
- Some items—like the basketball hoop and target board—require precise vertical mounting. Misaligned hooks will prevent completion.
- Take your time to rotate objects before placing them, as slight angle adjustments can mean the difference between success and a misplaced piece.
- Regularly zoom in to ensure each detail matches the reference.
Tips & Tricks
- Use the game’s snap grid feature for pixel-perfect alignment.
- Group similar items—like the basketballs and wall posters—by placing one, then duplicating positions with minor tweaks.
- Save time by placing large pieces (bed, couch, desk) first, then filling gaps with smaller décor.
- If you get stuck, toggle the reference overlay to compare your layout against the completed image.
- Practice makes perfect: once you master the order of placement, building the room becomes a relaxing, satisfying ritual.