Dreamy Room Level 79 Walkthrough & Guide
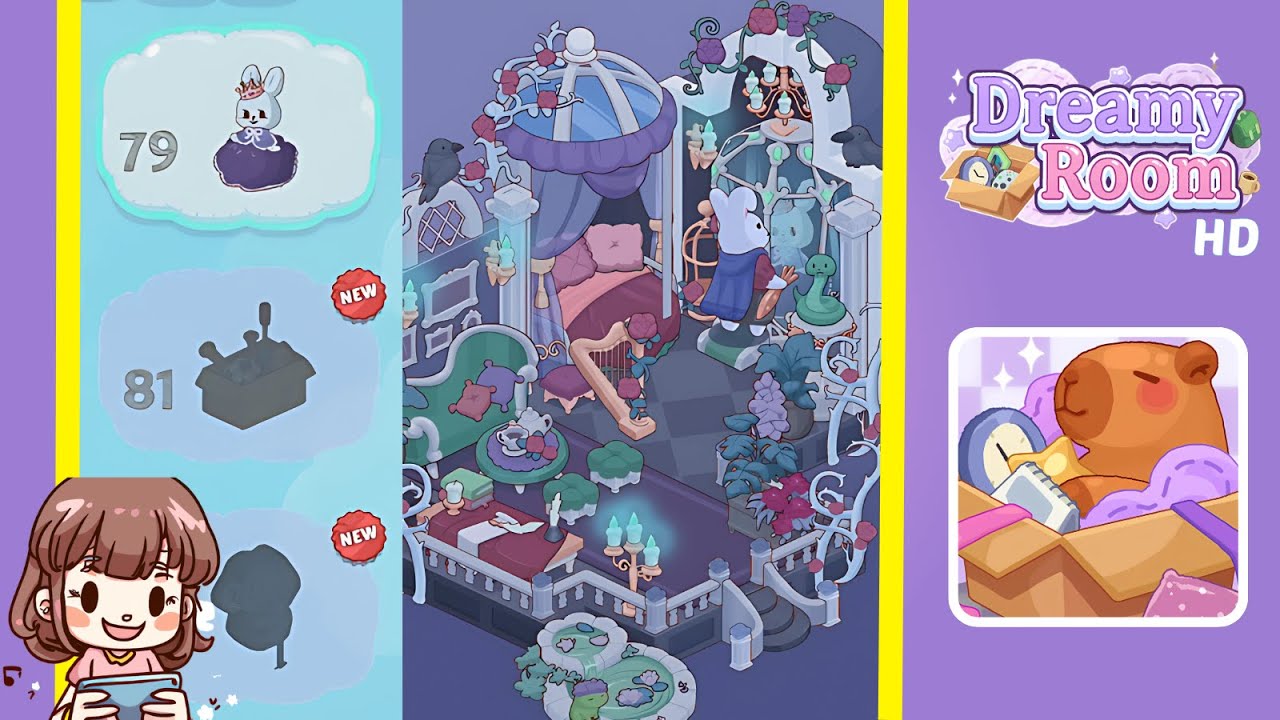
Welcome to our detailed guide for Dreamy Room Level 79, where you’ll learn exactly how to transform the empty isometric platform into the fully decorated space shown in the completed image. Follow each step carefully—placing the right piece in the right spot is the heart of Dreamy Room Level 79’s challenge.
Step-by-Step Guide
- Place the canopy bed under the glass dome. Begin by dragging the purple canopy bed and positioning it directly beneath the circular glass dome on the left. Center it so the bedframe legs align with the dome’s base.
- Place the purple drapes on the dome supports. Select the flowing purple drapes and attach them to the vertical bars of the dome. Let the fabric hang down evenly on all sides, creating that cozy canopy effect.
- Place the pink pillows on the bed. Grab the two heart-shaped pink pillows and set them side by side at the head of the bed, just inside the canopy.
- Place the rose vines around the dome supports. Take the twisting white vine pieces with pink roses and wrap them around each pillar of the dome frame, starting at the base and spiraling up toward the finial.
- Place the arched vine entry on the right wall. Position the white archway entwined with rose vines into the right alcove of the room’s back wall, lining it up flush with the wall’s curve.
- Place the crystal orb stand in the right alcove. Drag the ornate metal stand with glowing green orbs into the center of the right alcove, just under the arched wall.
- Place the chandelier above the crystal orb stand. Attach the small gold chandelier—complete with teal candles—to the ceiling hook directly above the orb stand for that magical glow.
- Place the bunny statue on the green pedestal in front of the orb stand. Select the white bunny figure wearing a purple cloak and set it atop the green circular pedestal, facing the crystal orb.
- Place the pedestal table with the snake figurine next to the bunny statue. Position the small white round pedestal table to the bunny’s right, then place the coiled green snake figurine on its surface.
- Place the gold harp to the left of the bed. Drag the elegant gold harp and tuck it beside the left leg of the canopy bed, angling it slightly toward the center of the room.
- Place the green chaise lounge against the left wall. Move the mint-green chaise lounge so it sits flush against the left wall panel, leaving room for other accessories in front.
- Place the purple cushion on the chaise lounge. Grab the small purple cushion and set it on the chaise lounge toward the right end for a pop of color.
- Place the tea set on the round side table. Take the petite round table with green legs and place it near the chaise. Then set the white teapot, cup, and plate of treats on top.
- Place the clover-shaped stools around the tea table. Arrange the three small green clover stools evenly around the tea table, creating a cozy seating cluster.
- Place the wall sconces with teal candles on the left wall. Attach the two gold wall sconces—each with three flickering teal candles—to the left wall, flanking the chaise lounge area.
- Place the picture frames on the left wall. Select the empty white frames and hang them in a staggered arrangement between the sconces and the chaise lounge.
- Place the floor candelabra with teal flames at the front left corner. Position the tall, four-armed floor candelabra on the front left edge of the platform, ensuring the glowing teal flames face inward.
- Place the stack of books and single candle on the front platform. Stack the two green books near the center front, then place the single white candle on top for a literary touch.
- Place the lily pond with frog at the front center. Drag the round pond feature with lily pads and the little green frog to the bottom center, just beyond the railing.
- Place the white railing and staircase at the veranda edge. Click to add the white balustrade railing all along the front edge, then snap the small curved staircase into the central gap.
- Place the rose vines around the railing and arches. Use the remaining vine pieces to weave around the railing posts and the top of both arches, uniting the floral theme.
- Place the two crows on the top of each arch. Finally, set one black crow figurine on the left dome arch and the other on the right entry arch to complete the scene.
Notes & Precautions
- In Dreamy Room Level 79, every object must snap precisely into place—if an item doesn’t click, try nudging it a few pixels until the outline turns green.
- Be mindful of overlap: placing vines before the railing can block snap points for the staircase.
- If your screen lags when adding the chandelier, save once and reload the level to prevent misplacement.
- The lily pond must be the very last outdoor piece; placing it too early can obscure railing snaps.
Tips & Tricks
- Group similar tasks together (e.g., all floral vines at once) to avoid back-and-forth adjustments.
- Use the game’s rotate handle sparingly—most pieces are pre-aligned for you in this level.
- If you lose your place, refer to the room’s shadows: items should align with the existing floor grid.
- For a quicker setup, drag each rail segment to its approximate spot, then fine-tune from left to right.
- Remember, Dreamy Room Level 79 is all about the meditative joy of perfect placement—take your time and enjoy the bloom!