Dreamy Room Level 93 Walkthrough & Guide
This walkthrough will guide you through the Dreamy Room Level 93, ensuring precise placement of all elements for perfect completion.
Step-by-Step Guide
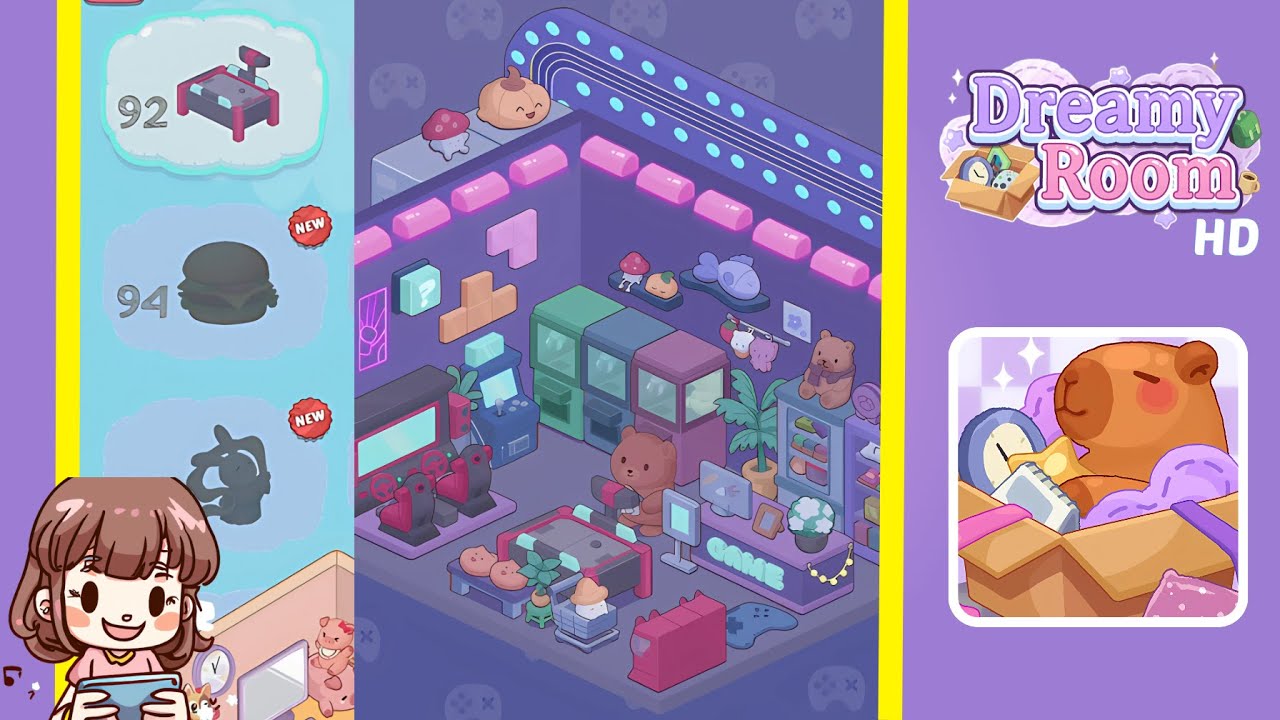
- Install the back wall’s shelving and upper decorations. Start by placing the large light-grey two-unit cubic shelf in the back-left corner, aligning it with the floor grid. Arrange the red-spotted mushroom on the left platform and the smiling pumpkin on the right. Mount the slender oval grey platform two tiles to the right, positioning the pastel blue fish at its center. Affix the long curved neon tube with aqua dots along the upper back wall, above the shelf line.
- Position the pink neon ceiling accents and left wall decals. Place seven pink neon bars along the ceiling: four on the back wall, three on the left wall. Use grid markers for centering. Flush two vertical neon line-art modules against the left wall corner, add the teal question-mark cube one tile to the right, place the pastel pink Tetris Z-piece above the tan L-shaped block, and slot the small aqua three-unit block below.
- Arrange the gaming rigs on the left floor area. Position the twin red racing simulator cabinets against the left wall, center the purple platform base one tile from the corner. Adjust the seats so steering wheels face the room’s center. Place the compact blue arcade joystick stand to the right, angled at forty-five degrees.
- Set up the back-center upright arcade cabinets. Align the two green cabinets in the center of the back wall with perpendicular screens. Leave a half-tile gap, add the purple arcade cabinet with aligned coin slot. Ensure each machine's base integrates seamlessly into the floor and check spacing for symmetry.
- Furnish the central gaming counter and cozy decor. Position the purple console table centrally, neon GAME sign facing the entry. Place the brown bear figure behind the table with a game controller in front of the monitor. Set the potted plant beside the picture frame, tuck the tall palm plant one tile behind the console. Hang pastel plush charms along a rod above the counter.
- Complete the right shelf and arrange floor accents. Place the tall purple bookshelf against the right wall, organize pastel books and boxes on shelves. Position a teddy bear, digital clock, and spool reel on top, with a tiny beige box to the side. Lay the dark blue controller-shaped rug in front of the console. Set the red game console in the lower-right corner, place the coffee table in the center-front, and top it with pastries, plant, and a crate containing a white dumpling.
Notes & Precautions
- Align items using grid overlays—any misplacement may cause rejection.
- If an item doesn't snap, remove and replace it for realignment.
- Install ceiling lights before wall decals and shelves to prevent order lockouts.
- Zoom and pan to inspect angles for racing stands and joystick modules.
- Narrative cutscenes unlock only when all objects are correctly placed.
- Take periodic screenshots to backtrack without restarting.
Tips & Tricks
- Tap empty grid squares to reveal hidden snap points for placement anchors.
- Use the copy-paste feature for duplicating aligned items like neon bars.
- Place large anchor objects before smaller decorations to avoid clutter.
- Rotate objects one degree at a time with helper lines to confirm orientation.
- Toggle the helper grid to reset alignment glitches if stuck.
- Use the undo function liberally—quick backsteps are faster than manual adjustments.