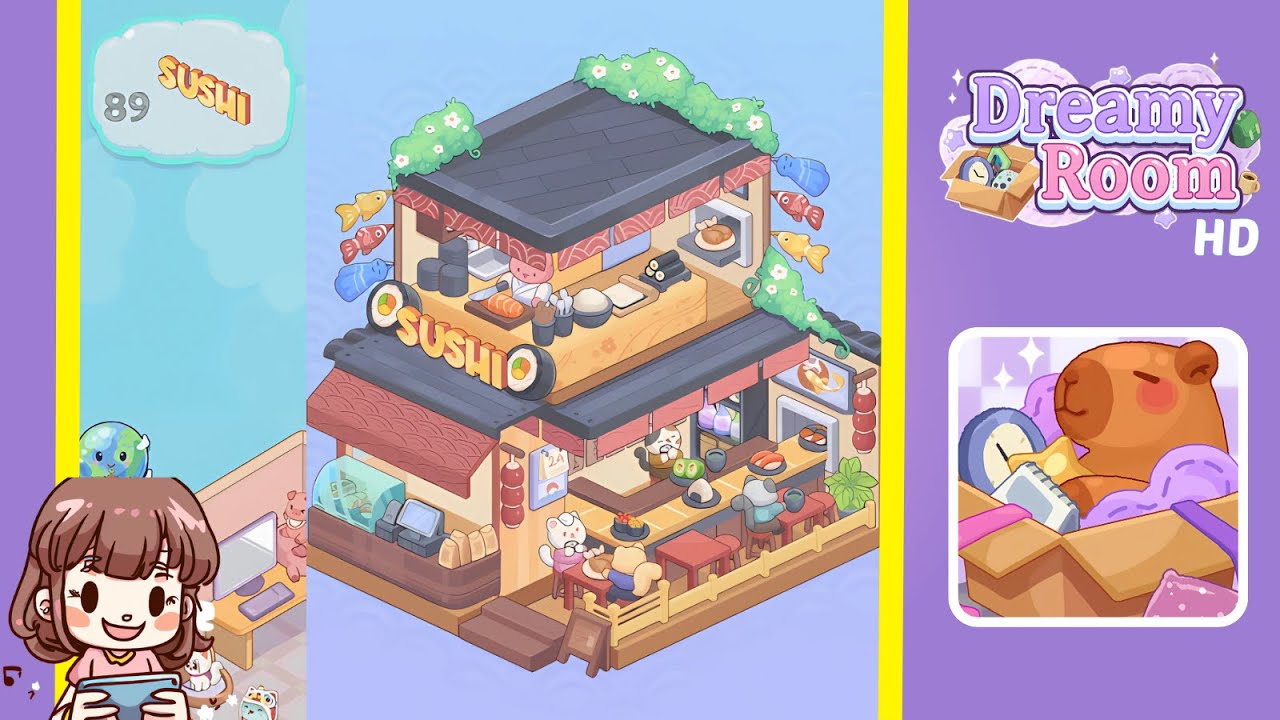
Dreamy Room Level 89 Walkthrough
Welcome to the Dreamy Room Level 89 Walkthrough. In this guide, you’ll transform the blank isometric space into a bustling, cozy sushi café. The main challenge here is figuring out exactly where each decorative and functional piece belongs. Follow these step-by-step instructions to place every object just right!
Step-by-Step Guide
- Place the wooden floor panel by dragging the large wooden floor tile into the center of the empty base. This forms the foundation for your sushi café.
- Attach the back wall by selecting the tall cream-colored back wall and snapping it into the rear edge of your floor panel. This wall will support the roof and decorations.
- Add the left side wall by choosing the shorter side wall with the pink-trimmed corner and position it on the left side of your floor panel. Ensure its edges align perfectly for a seamless corner.
- Install the right railing by grabbing the wooden railing piece and placing it along the right open edge of the floor. This defines the café’s outdoor seating area.
- Mount the rooftop base by picking up the dark grey roof slab and positioning it atop the two walls. This roof covers the sushi preparation area.
- Drape the greenery on the roof by selecting the vine of green leaves with white flowers and laying it along the front edge of the roof. This adds a cozy, natural touch.
- Hang the noren curtains by choosing the pink patterned curtain strips and hanging them under the roof overhang. These noren mark the entrance to the kitchen.
- Attach the koi fish decorations by placing the yellow, red, and blue fish decals around the roof’s corners—three fish on each side. These playful koi fish complete the rooftop theme.
- Position the sushi counter by dragging the long wooden counter onto the floor against the back wall. This counter serves as the main sushi bar.
- Seat the sushi chef cat by selecting the pink-cheeked cat chef and setting it behind the counter. Your chef will prepare all the sushi orders here.
- Add sushi prep items by placing the rice bowl, nori sheet on a wooden board, sliced salmon, and pre-rolled maki on the counter beside the chef. Precise placement highlights the busy kitchen vibe.
- Stack the black plates and utensils by putting the stack of round black plates on the far left of the counter, then adding the chopstick holder next to them. This setup is essential for the café feel.
- Install the “SUSHI” sign by attaching the bold yellow “SUSHI” letters to the front of the counter. Flank each side with a sliced sushi roll pillar. This headline signage is crucial.
- Place the glass display case by snapping the refrigerated display case onto the left end of the counter. This holds fresh sushi and pastries.
- Add the cash register and loaves by positioning the POS terminal next to the display case, then leaning the two bread loaves beside it. Small touches like these bring life to the café.
- Mount the calendar and lanterns by hanging the “24” desk calendar on the wall behind the counter, then placing the red cylindrical lanterns on either side of the entryway. These details complete the interior.
- Arrange the patio tables and chairs by dragging the small wooden table and two chairs onto the front patio area. Then add the row of three bar stools along the counter’s exterior. This seating welcomes customers.
- Seat your cat customers by placing the white and brown cat figures at the patio table and the grey cat on the rightmost bar stool. These customers bring charm and activity to the scene.
- Install the side oven and plant by snapping the stone oven with a baked fish dish into the right wall niche. Then add the leafy green potted plant beside it. These finishing touches warm up the corner.
- Place the entrance A-board sign by leaning the wooden A-frame chalkboard sign near the front steps. This last piece signals the grand opening.
Notes & Precautions
- Alignment Matters: Walls and floors must snap precisely—misaligned pieces can block object placement.
- Layer Order: Always place base elements (floor, walls, railing) before decorative items to avoid occlusion.
- Object Rotation: Some items can rotate. If a piece won’t fit, try rotating it 90° before snapping it in place.
- Overlap Prevention: Ensure the koi fish decorations and greenery don’t overlap each other; they each have a fixed “snap” zone.
Tips & Tricks
- Quick-Snap Shortcut: Double-tap an object to automatically snap it to the nearest valid position.
- Zoom & Pan: Zoom in close when placing small décor like the calendar or utensils—exact pixels matter.
- Undo Button: Made a wrong move? Use the undo icon immediately instead of dragging the piece back manually.
- Memory Aid: Memorize the order—walls → roof → counters → décor → characters—to breeze through without backtracking.