Dreamy Room Level 233 Walkthrough
Welcome to the detailed walkthrough of Dreamy Room Level 233. Follow these precise instructions to create a harmonious blend of whimsical machinery and vibrant horticulture within your game space.
Step-by-Step Guide
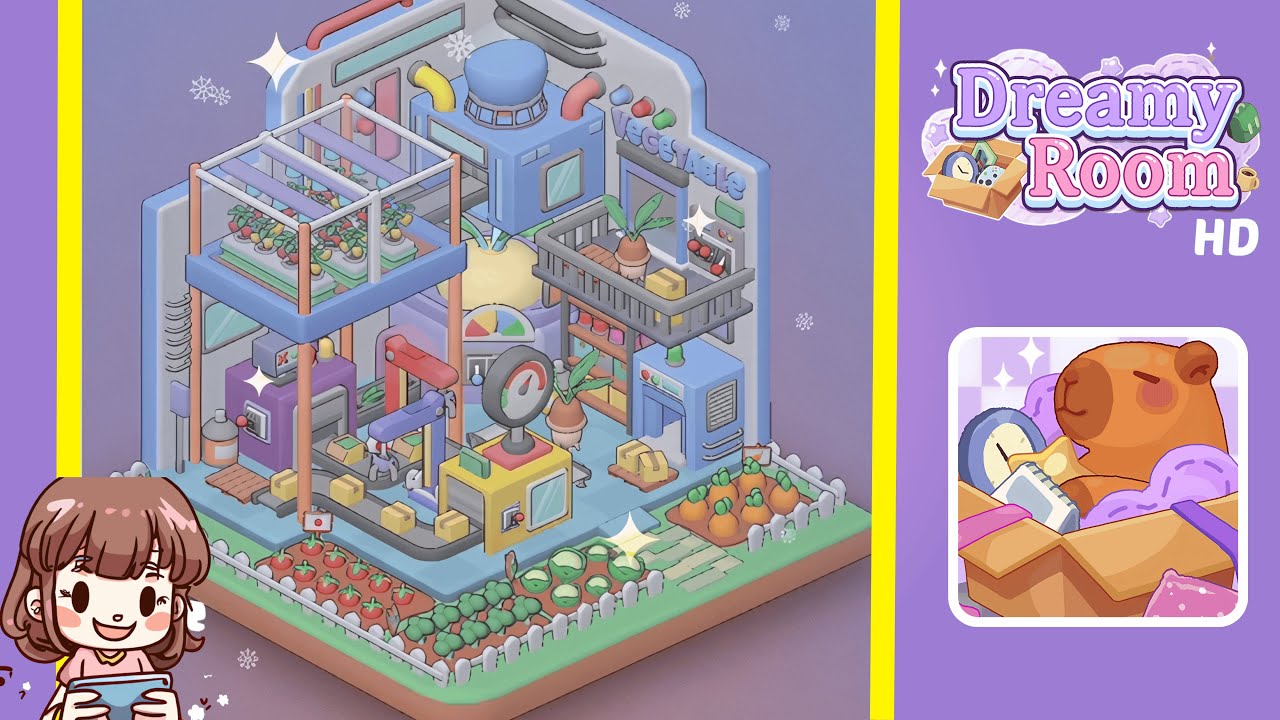
- Place the hydroponic greenhouse platform in the left section. Select the tall hydroponic greenhouse module from the "Garden Structures" category in your furniture library. Align the pastel-blue platform so its two back legs touch the grey back wall and its side rails meet the left wall. Rotate ninety degrees with grid snapping to fit the checkered floor tiles. Secure this foundation, attach white tubular rails to the top edge, and cover with transparent panels. Insert four small green planters for future tomato plants. Precise alignment is crucial for subsequent piece placement.
- Install the processing machine and conveyor system. After the greenhouse setup, locate the compact purple processing unit with a monitor from your inventory, placing it under the greenhouse's central edge, one grid tile from the back wall. Ensure the screen's green checkmark faces the room's center. Attach the cylindrical container to the left side, then assemble and align yellow conveyor segments from the machine's front output toward the floor's center, maintaining a straight line on the blue-tiled grid.
- Add the central gauge station and decorative elements. Focus on the central zone and choose the bright yellow gauge station from the item list. Position it at the end of the conveyor line with its meter facing the player. Secure the pressure gauge dial on top and adjust it for visual balance. Behind the gauge, connect the purple hydraulic arm's base to the left side and extend its gripper over the conveyor. Place the pie-chart console module in the slot against the back wall. Each piece should fit seamlessly to exhibit the workflow sequence of harvest, transport, evaluation, and packaging.
- Position the reactor and onion bulb. Locate the sky-blue reactor unit with a domed vent and place it on the right side of the back wall, near the greenhouse and gauge station. Rotate the vent forward and align it flush with the grey wall. Place the oversized onion bulb prop, resembling a creamy-white sphere with green sprouts, in front of the reactor. Center it between the pie-chart console and gauge station, ensuring the sprouts don't clip through nearby modules.
- Build the right-side shelving and refrigerated storage. Focus on the right wall and construct the storage rack and cooling unit. Snap the grey metal shelving crate midway up the right-side grey panel, ensuring its bars rest evenly. Inside, arrange a potted root vegetable and two small yellow packages evenly. Position the compact blue refrigeration module under the shelf, align it with the floor grid, top it with a yellow box, and connect a lift tray for sliding packages.
- Arrange the floor gardens and finish wall piping. Decorate the floor perimeter with garden beds and add wall pipes and valves. Outline each bed with white picket fences. In the front-left corner, place six tomatoes, then four leafy greens in the center, and five herbs or lettuce sprouts in the front-right corner, completing with three carrot plants. Attach three colored valve handles to the top right wall and snap curved black and pink pipes on the upper back wall to connect all areas.
Notes & Precautions
- Always enable grid snapping to prevent misalignment that may hinder module connection.
- Ensure each piece clicks and visually locks to avoid drift with camera adjustments.
- Avoid overlapping items, especially near the greenhouse and shelving, to prevent collision warnings.
- Rotate heavy modules like the reactor block carefully to prevent clipping through the wall.
- Regularly use auto-save to protect intricate configurations.
Tips & Tricks
- Plan your layout ahead by sketching a rough map to minimize trial and error.
- Use the rotate-collider tool to prevent object glitches during placement.
- Group similar items in your inventory by assigning colors or tags for quick access.
- Adjust the camera to a higher isometric view for better depth judgment.
- If a piece refuses to snap, try the "nudge method" by moving it slightly off-grid, then dragging it back.