Dreamy Room Level 215 Walkthrough & Guide
In this comprehensive walkthrough for Dreamy Room Level 215, you'll transform the blank shell of an empty futuristic chamber into a fully furnished and cozy hideaway. The level revolves around the satisfying puzzle of deciding where every luminous panel, planter, piece of furniture, and personal keepsake should go. As you follow each instruction, the static canvas will awaken into a vibrant, lived-in space. This guide offers precise placements, ensuring that every item nests exactly where it belongs. Prepare to dive into Dreamy Room Level 215’s gentle pacing as you bring order and warmth to the blank room.
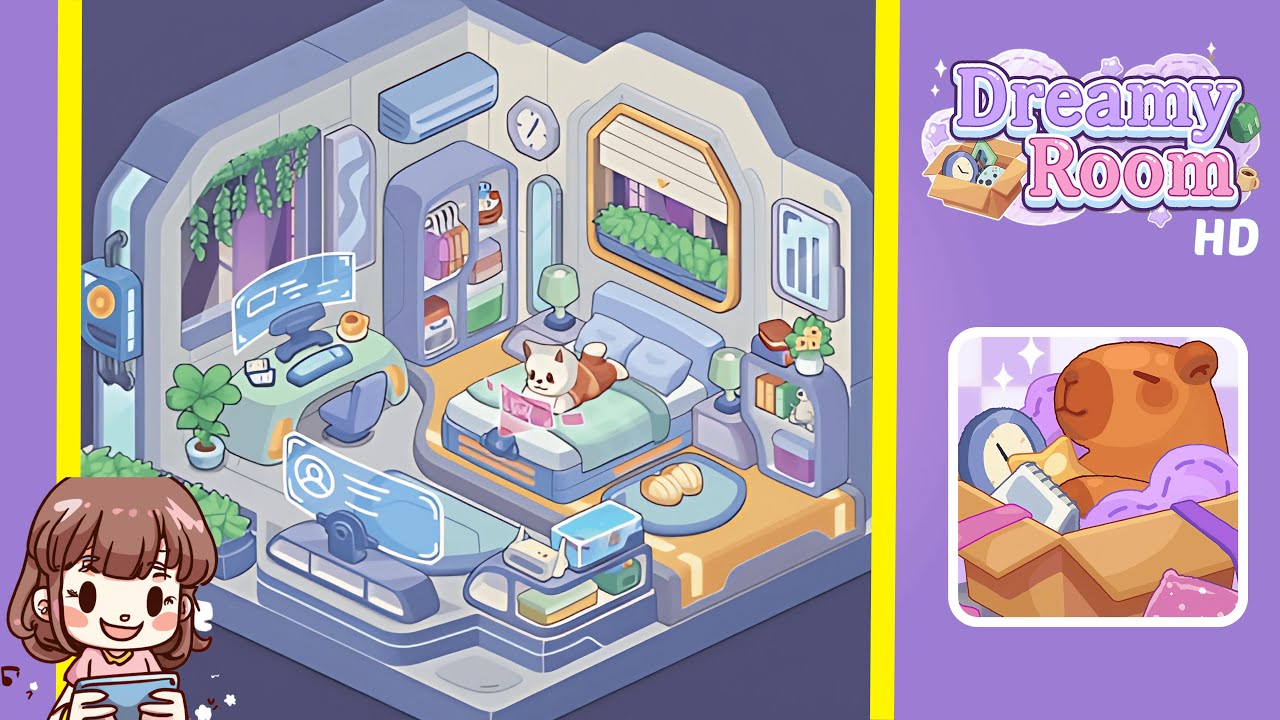
Step-by-Step Guide
- Place the illuminated wall panel on the left outer wall. Secure the tall glowing panel against the left external wall frame. Ensure the panel’s bottom edge aligns with the platform seam and its top edge nearly reaches the wall cap. Correct alignment here is vital to avoid issues with subsequent decorations.
- Place the planter box on the front-left edge of the floor platform. Lay down the long rectangular planter box along the front-left edge of the raised floor platform. Ensure its corners are snug against the platform’s border without overlapping the wall panel placed earlier.
- Place the curved desk and its accessories against the left interior wall. Center the desk against the left interior wall just a few inches from the corner seam. Snap in the ultra-wide holographic monitor above the desk surface, add a sleek keyboard below, and position a miniature webcam on the monitor's top edge. Place a warm coffee mug to the desk’s right and a small potted plant on the left side.
- Place the exercise console and holographic profile display by the desk area. Situate the futuristic exercise console in front of the desk area, centered below the desk’s middle. Hover the translucent holographic profile display above the console's control pad ensuring visibility and orientation toward the room’s center.
- Place the wardrobe, air conditioner, and clock on the back wall. Slide the tall wardrobe closet against the back interior wall by the right corner. Attach the air conditioner unit above it and fix the minimalist octagonal clock to the side.
- Place the right wall window, planter, and digital picture frame. Install the large window on the right interior wall, slotting the planter box beneath the window ledge. Attach the digital picture frame beside the window, aligning it with the window’s silhouette.
- Place the platform bed, bedding, and pillows in the center. Center the bed so it lightly touches the right interior wall. Lay the mint-green bedspread across the mattress and place two pillows near the headboard symmetrically.
- Place the personal accessories and finishing touches around the bed. Position the cat figure or virtual pet on the bed, lay it on its stomach with paws touching the holographic tablet. Arrange slippers on the round blue rug, and place bedside tables and lamps on either side of the bed. Add a fish tank, a twin-antenna router, and colored storage boxes on the front-right platform.
Notes & Precautions
- Players should be mindful of the game’s grid snapping behavior and object collision boundaries.
- An invisible guide helps align items, but relying on visual cues alone can lead to misplacement.
- Rotate your view if an object refuses to snap, and pay close attention to platform seams.
- Review placements before finalizing to avoid backtracking.
- Be cautious when dragging multiple pieces; furniture can overlap unexpectedly if moved too quickly.
- Keep an eye on scene outlines and color-coded highlights for correct object placement.
- Use the hint icon sparingly to maintain discovery.
Tips & Tricks
- Experienced players begin by positioning large furniture before smaller accessories.
- Rotate the camera to multiple angles to preview shadows and avoid collisions.
- Snap similar items together by holding the shift key to save time.
- Double-click on an inventory object to teleport it directly to the last placed location.
- Place items in order: start with wall fixtures, then move to floor objects, and finish with knickknacks.