Dreamy Room Level 203 Walkthrough
Welcome to the comprehensive guide for completing Dreamy Room Level 203. Follow these detailed steps to create the perfect layout in this level.
Step-by-Step Guide
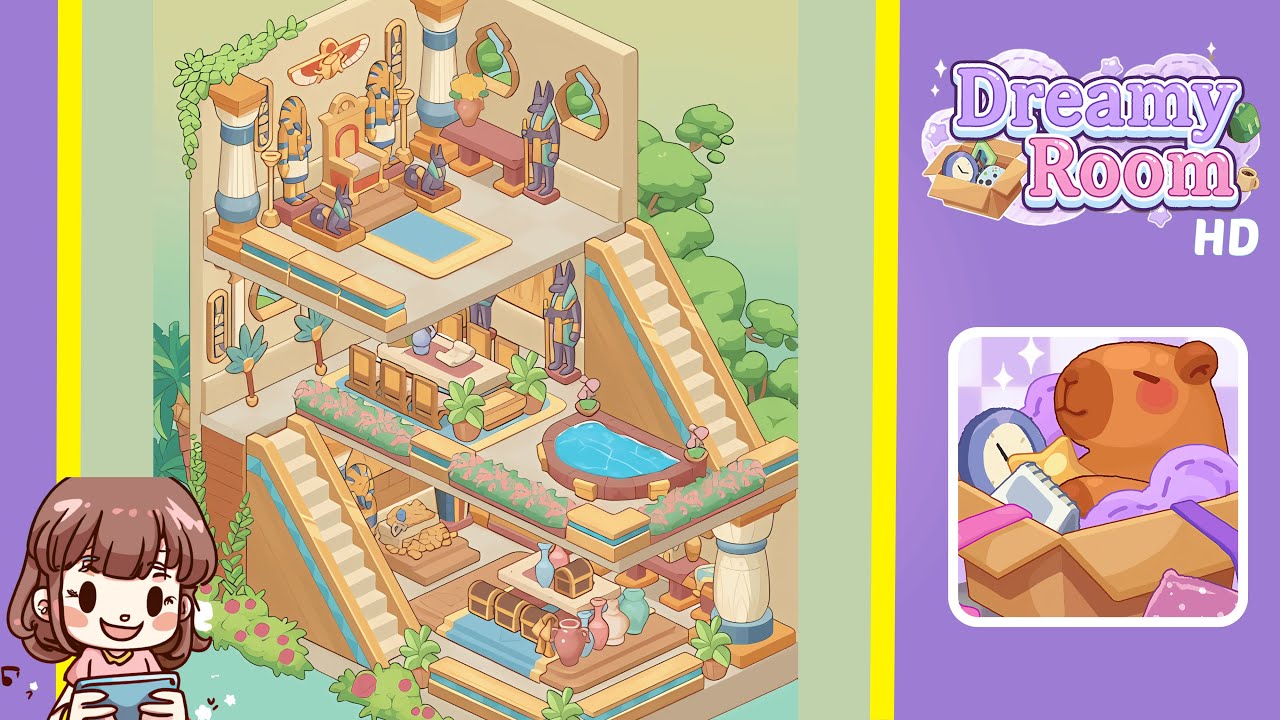
- Place the large support column in the bottom right corner. Identify the precise position for the support column, characterized by its ivory color and blue band. Align the column flush against the right-hand wall at floor level, ensuring the base does not protrude past the edge of the beige floor panel. Angle the column parallel to the right wall and adjacent to the back wall for perfect alignment.
- Place the left-side staircase against the left wall. Secure the staircase against the left wall's base, mirroring the angle of the support column. Align the bottom step one tile from the back wall, ascending toward the foreground. Ensure the staircase occupies three steps diagonally and confirms its back edge is flush with the left wall.
- Place the bottom treasure chest and vase display in the center of the bottom floor. Position the three wooden chests to the right of the left staircase's midpoint. Arrange the pastel-colored ceramic vases on the adjacent raised platform with symmetry: the tallest pink vase in the center, flanked by the mint vase on the left and the lavender on the right. Add potted palms on each side of the chest-vase display.
- Place the middle-level platform above the bottom floor. Construct the middle tier by dragging the medium-sized platform three tiles above the base floor, offset forward by one tile. Align the platform's back edge two tiles down from the top of the right wall. Confirm the platform spans four tiles wide and two tiles deep.
- Place the dining table set with chairs on the middle platform. Position the rectangular stone table at the center of the middle platform. Arrange six wooden chairs symmetrically along the table's edges. Add a scroll and ink set at the center of the table and two potted ferns at the table's corners to frame the scene.
- Place the decorative pool and flowerbed on the right side of the middle platform. Position the oval plunge pool flush against the platform's front-right corner, with an overhang of half a tile. Place the linear flowerbed along the platform's front edge, extending from the pool to the left staircase's top step. Add rose planters at each end of the flowerbed.
- Place the upper-level platform and twin Anubis statues at the top corner. Situate the topmost platform three tiles above the middle tier, offset back by one tile. Align its front edge with the top of the right wall. Position the pair of Anubis statues on the top platform's corners, maintaining symmetry and a one-tile gap from the edge.
- Place the throne, pharaoh statue, scarab medallion, hieroglyph panels, and floral vines on the upper platform. Center the ornate throne at the top platform's back. Place the pharaoh statue on a raised dais to the left of the throne. Mount the scarab medallion above the throne and position hieroglyph panels on either side. Drape trailing vine décor over the left upper corner.
Notes & Precautions
- Precision Matters: Even a half-tile misplacement can cause misalignment. Always use grid overlay and zoom tools for large pieces.
- Layer Order: Place structural platforms and stairs before decorative items to avoid the need for repositioning.
- Inventory Limits: Manage inventory by grouping similar items to efficiently handle restrictions.
- Undo Sparingly: Limited undo uses encourage careful placement over trial and error.
- Visual Reference: Keep a completed image handy to match colors, shadows, and angles accurately.
Tips & Tricks
- Anchor Points: Establish anchor points with the bottom right column and left staircase for intuitive placements.
- Batch Placement: Use the “multi-select” tool for grouping similar items and ensure uniform spacing.
- Grid Nudges: Use nudge buttons for one-pixel adjustments on items that slightly overlap.
- Visual Layers: Toggle off non-essential interface elements while placing detailed decorations.
- Early Testing: Place temporary markers to verify item placements and avoid surprises.