Dreamy Room Level 310 Walkthrough
Welcome to the Dreamy Room Level 310 walkthrough, where you'll transform a series of components into a bustling station scene. This guide provides comprehensive steps to help you assemble every crucial detail with precision and flair.
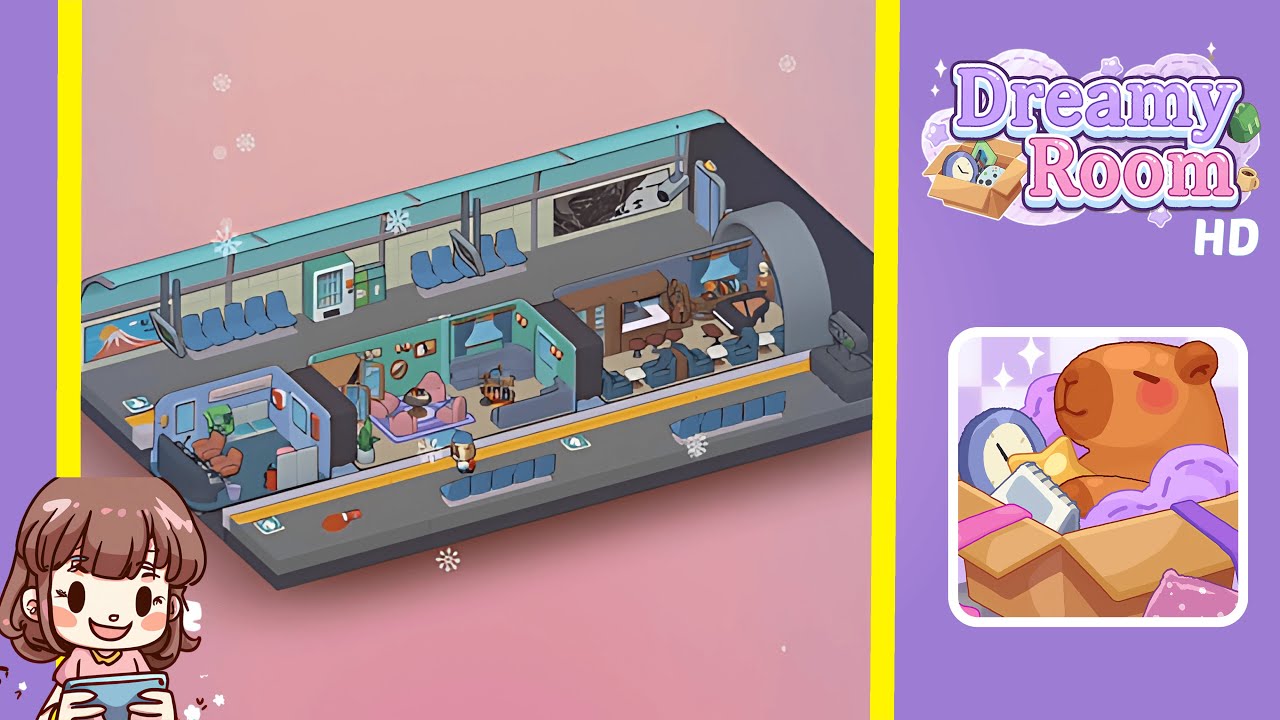
Step-by-Step Guide
- Place the glass roof panels and wall frames along the back platform. Start by snapping the turquoise glass roof sections in a continuous run along the back edge. Under them, set the pale green wall panels between the vertical posts to align with the roof braces, creating a sheltered concourse. Ensure the leftmost end curves into a rounded front canopy and keep the safety yellow edge visible. Center the tunnel arch on the right wall opening.
- Mount the advertising screen and JR hanging boards on the left. Hang the wide billboard showing a red-capped mountain under the curved canopy. Place two green JR-style hanging boards under the roof beam, angling them for visibility. Add a small white floor light tile beneath each sign.
- Add bench rows and the vending machine cluster. Line three blue bench groups along the back platform, spacing them evenly. Install a mint-green vending machine pair slightly left of center against the wall, adding a tiny trash bin or service box. Echo the square floor panels near the benches.
- Position the first-aid mini train car at front-left. Set the rounded-nose mini car with the red cross panel facing left. Inside, place orange reclining seats and a medical cabinet. Add a pink bucket near the door and a white plus sign box outside. Place a potted floor plant to the right of the car.
- Build the pastel living-room nook in the center. Place a pink armchair and loveseat around a low table with a dessert and drink. Stand a glass partition behind them and string decorative bulbs across the top. Mount a large turquoise panel on the back wall, readable as an aquarium or digital art screen, with two accent sconces above it.
- Install the instrument rack and coat hooks as a bridge zone. Place a narrow divider wall with a rack holding brass instruments and add a shelf with hooks. Position a slim bench or side table along the back, ensuring safety stripes are visible.
- Assemble the bar counter, shelving, and stools inside the tunnel lounge. Slide the bar under the tunnel's inner curve. Place back-bar shelving, align stools along the counter, and add a sideboard for glassware. Add a warm wall sconce near the arch mouth.
- Set the grand piano, tiny stage lights, and corner décor. Position the white grand piano at a slight angle with its bench facing the platform. Add overhead spotlights and a slender post lamp. Tuck a gold accent pedestal between the arch and piano.
- Finish the right-wall tech: security camera, wall map, door, and digital clock. Install a security camera, hang a metro map panel, and add a utility cabinet and door. Mount the digital clock showing 07:00 outside the tunnel.
- Populate the front platform: benches, litter, and detail tiles. Place three blue bench segments along the front platform. Scatter floor light tiles and add small "lived-in" objects like a capsule and a white card. Finally, place a bundled traveler along the yellow line.
Notes & Precautions
- Collision checks: Ensure benches sit flush with glass panels and the bar clears the yellow strip.
- Sightlines: Hang signs under roof beams to maintain visibility of vending machines.
- Tunnel spacing: Position the bar, stools, piano, and arch in a clean arc to avoid collisions.
- Repeating tiles: Remember the small square floor panels for symmetry.
- Story balance: Keep the first-aid car’s components in their designated locations for narrative coherence.
Tips & Tricks
- Anchor first, decorate second: Set the roof line, tunnel arch, and benches before adding props.
- Mirrors of three: Use triads of benches and light tiles for easier alignment detection.
- Zone logic: Complete each of the four zones—Left Waiting, Medical Car, Living Nook + Music Prep, Tunnel Lounge—before proceeding.
- Use edge cues: The yellow safety stripe is your ruler; nothing should cross it.
- Micro-props last: Place small items like capsules and plants after establishing major furniture.