Dreamy Room Level 194 Walkthrough & Guide
Welcome to this comprehensive guide for Dreamy Room Level 194. In this level, you begin with an empty beige checkerboard interior and a simple grass platform outside. This walkthrough will guide you through each placement, from the floor tiles to the final decorative touches. The core philosophy is rooted in peaceful, mindful organization—every object has its perfect spot, and the main challenge lies in discovering that correct placement.
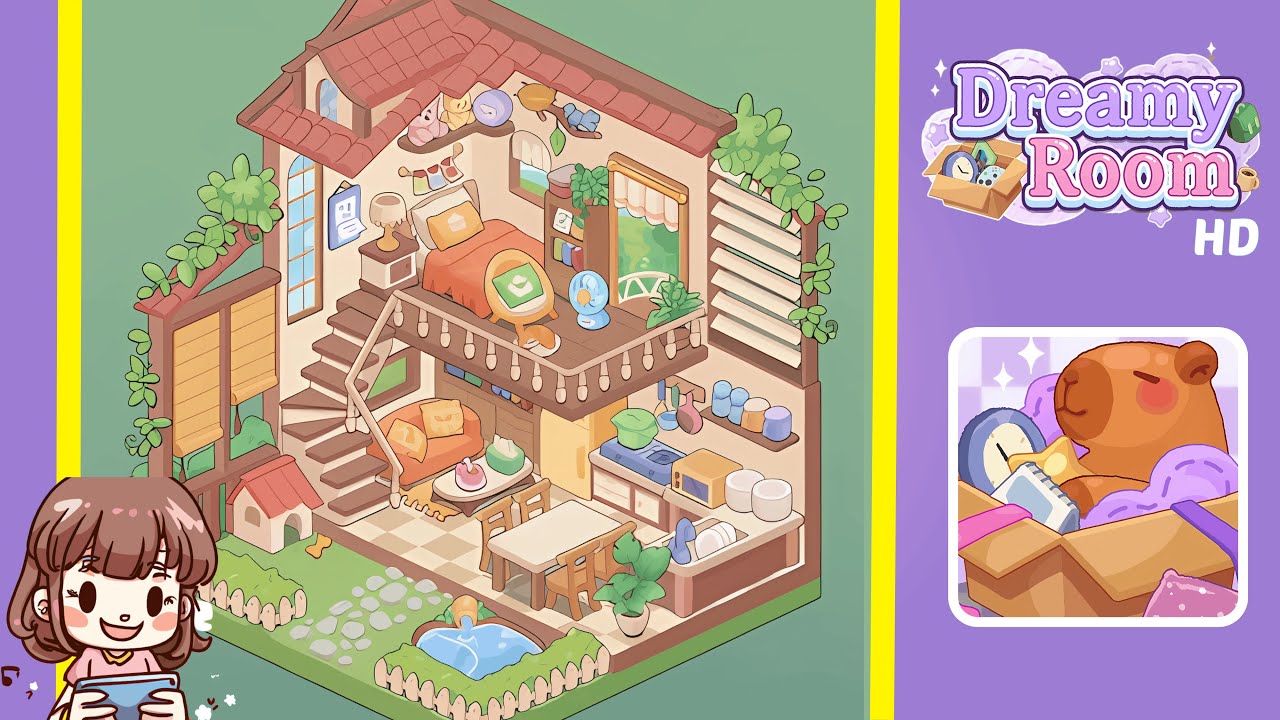
Step-by-Step Guide
- Place the checkerboard floor tiles in the interior of the room. Align the beige-and-cream checkerboard tiles perfectly within the L-shaped room. Precise alignment is crucial as these floor tiles set the aesthetic tone and determine where all subsequent furnishings must sit.
- Place the grass base in the outdoor yard section. Position the bright green grass tile flush against the left exterior of the checkerboard interior.
- Place the stepping stones and garden pond in the yard area. Arrange the stepping stones in a gentle arc leading from the grass platform to the interior doorway. Position the small round pond centrally within the front yard, slightly offset from the stepping stones.
- Place the picket fence, dog house, and bone in the garden. Attach the white picket fence around the front of the yard platform. Add the small dog house with its red roof, positioning it snugly against the left fence, and place the tiny yellow bone near the dog house entrance.
- Place the spiral staircase against the left interior wall. Align the white-and-brown stair piece with the left interior wall of the checkerboard floor, ensuring seamless connection to the mezzanine balcony.
- Place the sofa, cushions, and coffee table in the living area. Center the small orange sofa with two yellow-checkered cushions under the mezzanine. Position the cushions neatly on each end of the sofa back and place the oval coffee table in front of the sofa.
- Place the dining table and chairs near the kitchen. Situate the rectangular wooden dining table on the checkerboard floor so it sits close to the kitchen cabinets. Place one chair on each longer side of the table.
- Place the kitchen cabinets, sink, plates, microwave, stove, and pot. Position the lower kitchen cabinets along the right interior wall. Place the sink module, stacked plates, cream-orange microwave, stove, and green cooking pot appropriately in the kitchen setup.
- Place the hanging utensils and spice jars above the kitchen. Hang the utensil rack and position the pastel spice jars on the slim wooden shelf nearby.
- Place the windows, shades, curtains, and climbing vines. Place the tall arched window on the left wall above the stairs. Install the yellow roman shades, white-pink striped curtain, and green climbing vine decals on their respective spots.
- Place the bed, blanket, pillow, bedside table, lamp, calendar, and garland on the mezzanine. Center the wooden bed frame on the mezzanine floor. Place the white flower-emblazoned pillow, bedside table with lamp, "10" calendar, and mini-photo garland accordingly.
- Place the stuffed animals, chair, cushion, fan, sleeping cat, and potted plant on the mezzanine railing and floor. Arrange the plush toys on the sloped roof ledge. Position the stool-style chair with a green flower cushion, the blue oscillating fan, the sleeping cat, and the leafy potted plant suitably.
Notes & Precautions
- Alignment Matters: Even a one-pixel misplacement can throw off the entire layout. Always zoom in to verify that edges meet exactly.
- Layering Order: Ensure larger architectural items go down first, then furniture, followed by small accents.
- Collision Checking: Use “nudge” controls if pieces snap incorrectly.
- Save Often: Although there is no timer, save your progress before adding delicate decorations.
- Patience Is Key: Mindful placement is crucial; avoid rushing to prevent frustration.
- Revert If Needed: Use the undo button if an object overlaps; it’s easier than manual realignment.
Tips & Tricks
- Grid Snapping: Enable this setting for easier alignment of the checkerboard pattern and furniture bases.
- Rotate with Precision: Use small rotate buttons for accurate positioning of the staircase.
- Layer Preview: Toggle the semi-transparent preview before finalizing each placement.
- Group Placement: Group similar items like spice jars and place them in one go for better spacing.
- Use Shortcuts: Memorize hotkeys for bring-to-front/back for quick arrangement of items.
- Reference the Completed Scene: Use a screenshot of the completed level as a visual checklist.