Dreamy Room Level 265 Walkthrough & Guide
Welcome to the Dreamy Room Level 265 walkthrough. Follow these detailed steps to transform the plateau into a lively desert campsite, filled with exciting exploration opportunities and dynamic interactions.
Step-by-Step Guide
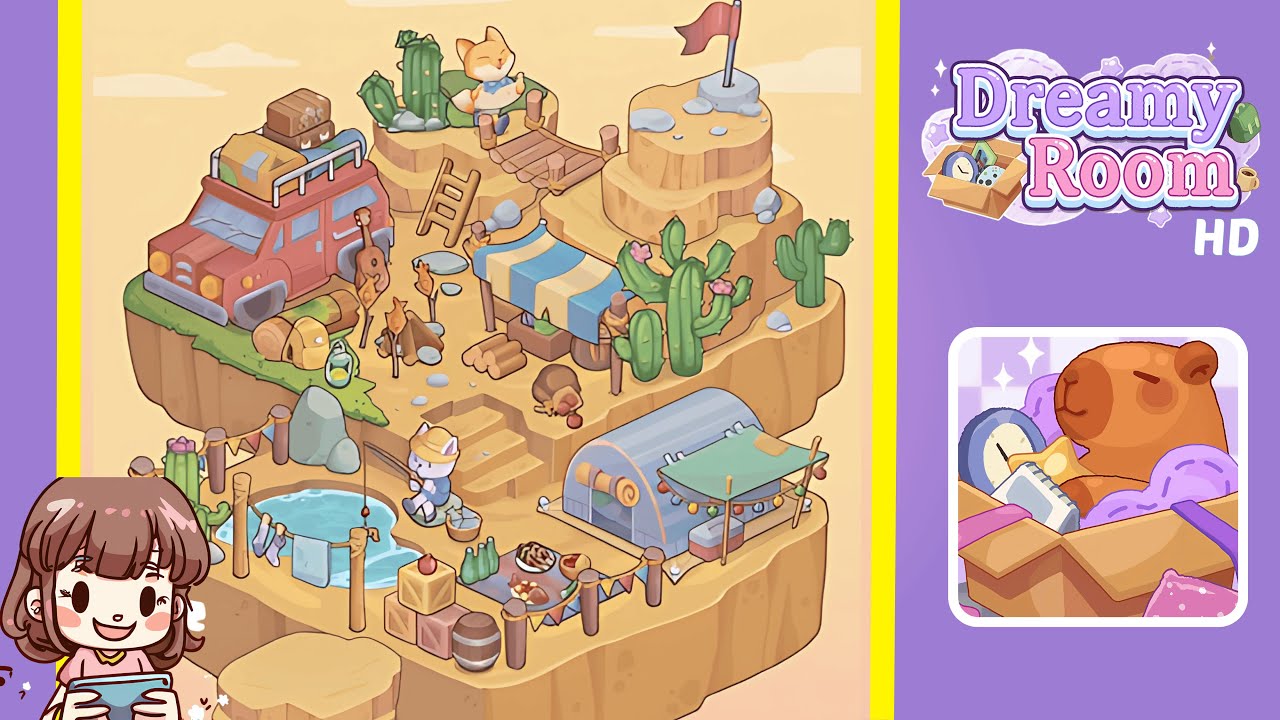
- Position the Red Jeep on the Upper Left Plateau. Begin by placing the large red jeep on the upper left plateau. Ensure that the front bumper aligns slightly off the edge, while the rear rests towards the grassy area. Add a rolled sleeping bag, large yellow helmet, and green bottle next to the jeep's right side. Behind it, scatter the guitar and camping gear. Attention to accuracy here is crucial as it sets up the orientation for the entire upper-left environment, making room for cactus placement later.
- Create the Fishing Corner at the Lower Left Pool. Locate the round blue water pool in your object list and place it on the lower left plateau tier. Position a wooden post and fishing rod with a seated white cat right at the pool's edge. Behind the fisherman, hang two pieces of laundry—a towel and shirt—between poles. To the far left, place two large green cacti with pink flowers to frame the area. Proper spacing is essential to avoid overlaps with later-placed market stalls and decorative bunting.
- Set the Main Market Area in the Center. In the center plateau, position the striped blue-and-yellow market stall, ensuring its left side nearly touches the ladder leading to the jeep area. Scatter wooden crates, logs, and small supplies underneath the stall. On the right, place the brown sack and a red apple on the ground. This middle zone serves as the main trading hub, so maintaining symmetry is important. Ensure clear paths for characters to "walk" between zones, which enhances the scene's dynamic feel.
- Place the Greenhouse and Dining Area on the Lower Right. To the lower right of the central market area, position the small semi-cylindrical greenhouse. In front, set the green canopy awning decorated with string lights. Arrange picnic-style food—grilled meat skewers, a plate of cooked fish, and a bowl of salad—on the central table. Surround the table with crates, barrels, and a red apple for added detail. A well-arranged setup enhances the area's cozy feel for adventurers gathering after a day's exploration.
- Build the Upper Right Lookout with Bridge and Flag. Move to the top right raised plateau and place the rocky lookout point. Ensure the red flag is firmly centered on the flat rock's summit. Connect the lookout to the main plateau with a short rope bridge, and below, set a small wooden ladder connecting the lower cactus zone to the bridge entrance. This arrangement provides vertical interest and a realistic path for character traversal across height levels.
- Populate the Scene with Cacti, Rocks, and Characters. Distribute cacti of varying heights around the environment—two tall cacti on the far right near the lookout, one short cactus at the lower left pool, and another mid-height cactus near the jeep. Scatter smooth grey rocks in clusters, especially at staircase edges and plateau corners. Place the orange cat character on the rope bridge to imply exploration, ensuring both animals face slightly toward the center for scene cohesion.
Notes & Precautions
- In Dreamy Room Level 265, incorrect placement of large items (e.g., jeep or greenhouse) early on can block space for smaller decorations later.
- Be careful of overlapping objects; items such as barrels and crates have invisible hitboxes that can prevent correct positioning.
- Ensure the fishing pool is positioned exactly so the fisherman’s line reaches the water for the game to count it as “placed correctly.”
- The rope bridge and ladder must align perfectly to maintain path continuity between plateaus.
Tips & Tricks
- Place the largest items first to prevent rearranging mid-progress.
- Use shadow outlines as guides for placement, even if they are slightly faded.
- Group related objects: camping gear near the jeep, food near the dining area, and tools near the market stall.
- Don't rush—this level rewards patience as many items require pixel-perfect placement to lock into place.
- Zoom in frequently when placing small items like apples, skewers, and laundry for better accuracy.