Dreamy Room Level 253 Walkthrough
Welcome to Dreamy Room Level 253! This guide will walk you through every detail of setting up the perfect amusement nook, maintaining precision and ensuring everything fits perfectly.
Step-by-Step Guide
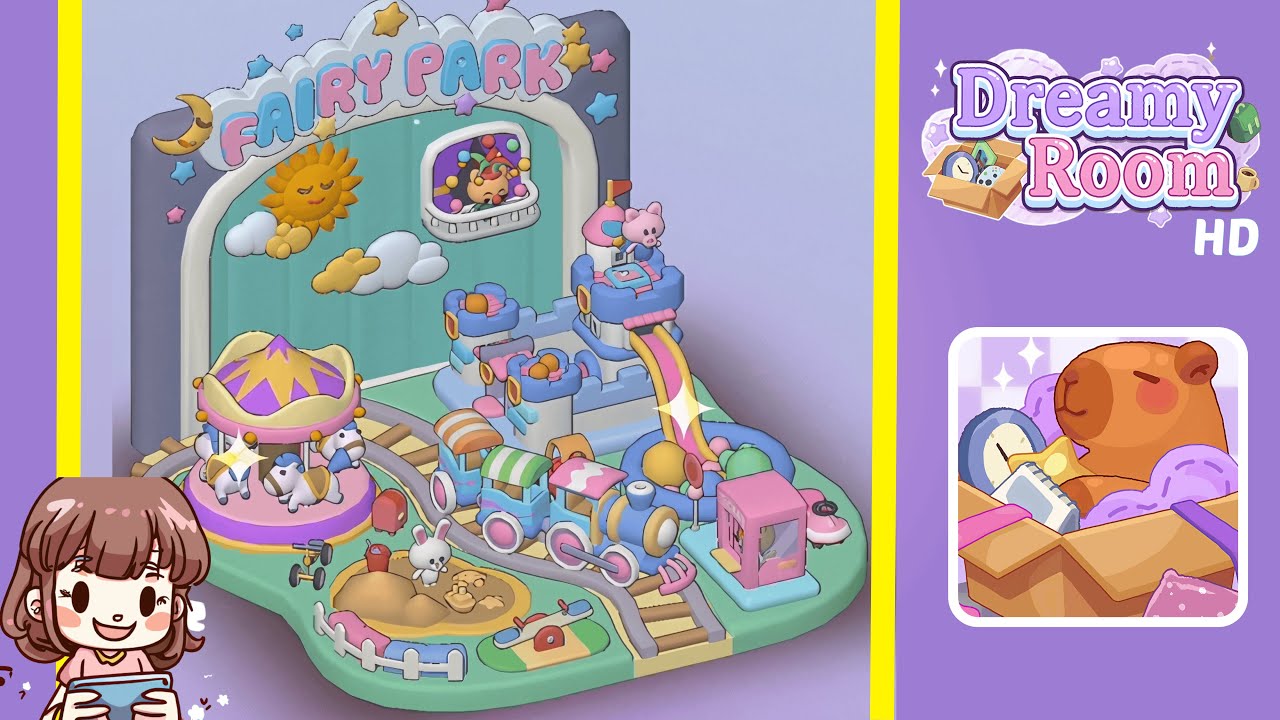
- Place the arched back wall and cloud marquee at the rear center. Begin by positioning the arched teal back panel with cream trim flush against the purple wall slab, aligning its right corner with the platform's curved edge. Attach the cloud marquee labeled "FAIRY PARK" to the arch's top rim, ensuring the crescent moon is on the left with pastel stars scattered across the top. Add tiny pink and blue star studs to the purple sidewall with two on the right edge and one on the left.
- Lay the grassy base, winding path, and track bed across the floor. Center the mint-green floor slab at the arch base. Arrange the buttery-yellow path from the platform's front-right lip, curling left and tapering under the arch. Place rail sleepers in the groove along the left and front edges, hugging the carousel bay and returning right. Leave a gap at the right-front corner for the arcade area.
- Build the castle-and-slide complex with the ball pit on the back-right. Assemble three terraces of blue castle platforms on the right rear. Orange window panels face forward, capped by pink trim on each turret. Add the pink flag to the highest tower and perch the pig mascot just below. Angle the rainbow slide from mid-height to curve down toward the center-right, docking the round blue ball pit at the slide's foot.
- Install the carousel plaza on the front-left curve. Position the pink-and-yellow carousel base on the track’s inner bend, with the lavender canopy's tallest seam pointed toward the arch. Arrange the three white horses evenly, all facing clockwise. Place a red hydrant-shaped bollard behind the carousel’s outer ring, ensuring the platform lip shows a mint border around the ride.
- Arrange the train set: engine, cars, and the full loop. Place the blue-and-gold locomotive on the straight beside the path’s left bend with its circular front plate facing right. Couple the three cars behind it: green-striped roof, pink-striped roof with a motif, and orange-roof caboose. Thread the train along the loop to pass the carousel, sneak behind the sandbox, and curve toward the right-front arcade.
- Build the sandbox mini-park with bunny, tools, and fencelets. On the front-left inner lawn inside the rail loop, drop the round tan sandbox. Snap the white fence segment to its left arc. Position the white bunny facing the viewer in the sand, with a bucket/spade to its right. In front, angle the blue seesaw toward the right-front corner. Park the red-and-black tricycle near the rails.
- Set the arcade corner: claw machine and round console. Place the pink claw/gacha machine in the right-front corner, ensuring its display window faces left. Next to it, position the small round white-and-pink dome console ahead of the tracks. Keep the machine well-spaced from the slide landing.
- Finish the sky: sun, clouds, window vignette, and star sprinkles. On the back panel, attach the smiling sun with puffy clouds to the left interior. Mount the rounded window with a sleepy character on the right interior, aligning it with the sun’s lower edge. Scatter little stars around the cloud marquee, tilting the crescent moon to smile toward the carousel.
Notes & Precautions
- The platform edges are curvy, requiring fine adjustments to avoid overlapping.
- Ensure the carousel and arcade cabinet do not touch the rail sleepers to avoid train jitters.
- Align the castle’s slide mouth directly over the ball pit with no gaps.
- Verify the outward-facing bunny position; reversed poses alter the scene.
- If snapping issues arise, lift and re-seat items rather than forcing them.
- Provide ample space for the "FAIRY PARK" marquee and stars to avoid clipping.
Tips & Tricks
- Place tall items first to establish sightlines before arranging lower elements.
- Use the yellow path as an alignment guide for the carousel and train route.
- Preview the room for shadow overlaps indicating bad placements.
- Save small accents for last to prevent disturbances during larger builds.
- Set the engine first and then snap the cars in order to prevent uncoupling.