Dreamy Room Level 100 Walkthrough
Transform the empty pastel corner into a cozy, toy-filled haven in Dreamy Room Level 100. This guide will walk you through every placement, from curtains to plushies, ensuring your Dreamy Room Level 100 turns out exactly like the completed scene. Remember, the core challenge of Dreamy Room Level 100 is finding the perfect spot for each item. Let’s begin!
Step-by-Step Guide
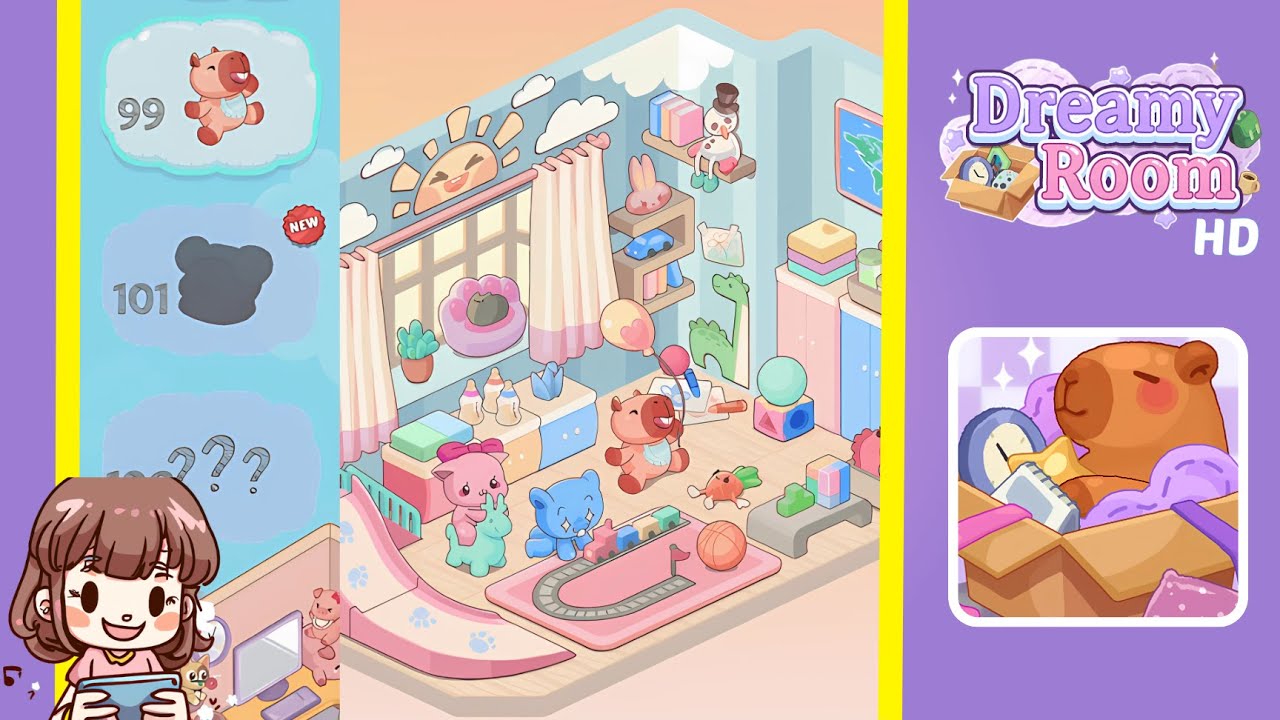
- Place the curtains and sky decals on the window wall. Select floor-length pink gradient curtains and hang them centered three floor tiles above the wooden platform. Affix the happy sun decal above the curtain rod and arrange three fluffy cloud decals around it.
- Arrange the windowsill decorations. Position the terracotta pot with a succulent on the left edge. Place the lavender cushion with the grey cat figurine toward the right side, keeping consistent distance from the window frame.
- Set up the cabinet under the window. Lay the folded pastel towels on the left side of the cabinet top, place baby bottles beside them, center the tissue box under the curtain’s midpoint, and put a pink towel right of the tissue box.
- Mount the right-wall corner shelf and decals. Install a two-tier wooden shelf, place a pink bunny plush on the top tier, and a toy car on the bottom. Above, attach a mounted shelf with pastel books and a snowman plush. Finally, place a floral drawing beneath the shelf.
- Apply the dinosaur decal and hang the map. Affix a green dinosaur silhouette at knee height, and hang the framed world map in the upper right, ensuring its straight alignment.
- Install the wardrobe and stack the top accessories. Position the wardrobe in the back right corner and arrange pastel storage tins and a lunchbox on top.
- Position the pink slide ramp and two plush toys. Align the ramp’s base with the room's left edge, place the pink llama plush on top, and the green alpaca rocker in front of the ramp.
- Lay out the train track and cat plush. Create a rectangle with the grey track piece, placing a pink train mat underneath, attach the pastel train engine, and position the blue cat plush beside the tracks.
- Add the bear plush with balloons and the carrot plush. Place the brown bear toy two tiles from the front wall, attach heart-patterned and teal balloons, and set the orange carrot plush in front of the bear.
- Arrange the puzzle bench, blocks, horse box, and ball. Position the puzzle piece bench, stack cube blocks on it, place a basketball in front, and position the horse plush box beside the bench.
Notes & Precautions
- The primary challenge is recognizing each item’s exact grid coordinates and orientation before placement.
- Rotate or flip objects where allowed to ensure proper facing directions.
- If an object seems stuck, nudge it one tile at a time rather than dragging quickly.
- Avoid overlapping items on the same grid cell as placements will be rejected.
- Save progress frequently as accidental moves can occur.
- Use the undo button sparingly to maintain the final layout unchanged.
Tips & Tricks
- Enable grid overlay to see exact tile boundaries before locking objects in place.
- Activate snap-to-grid in settings to keep items perfectly aligned.
- Group similar items and place them together to maintain spacing.
- Start with decals and curtains on the perimeter and work inward for better organization.
- Use keyboard shortcuts to rotate items swiftly by 90° increments.
- Utilize mirror mode to achieve perfect symmetry where possible.